PostsAboutGames

"Some Tank Game" in the browser!

August 05, 2021 - Søren Alsbjerg Hørup

After getting Bevy to run in the browser I started the process of porting Some Tank Game to the browser.

First step was to refactor my main.rs into a lib.rs such that I could use bindgen to generate Javascript bindings for my entrypoint and use the bevy_webgl2 plugin to render in the browser.

Next step was to get my levels to properly load. For Some Tank Game I use the Tiled editor to create and edit levels. The library I use also works in the browser, BUT! apparently not with external tile sets.

Reason for the lack of external tile sets support seems to be due to the async nature of Ajax requests. First, the .tsx map file is loaded. Next, the referenced external tile sets are loaded. In a native environment this will happen sequentially with blocking I/O and the tiled struct will be returned after all data and dependencies have been loaded. In the browser, only the .tsx file is loaded, subsequent external tile sets are not loaded as part of the .tsx file load due to the async nature of the browser. The open issue on the subject can be found here.

To fix this issue, I opted for the simplest strategy ever - just imbed the tile sets into the .tsx files. Not pretty, but working. A proper fix would be to somehow pre-load the tilesets before loading the maps, such that these are available from the start.

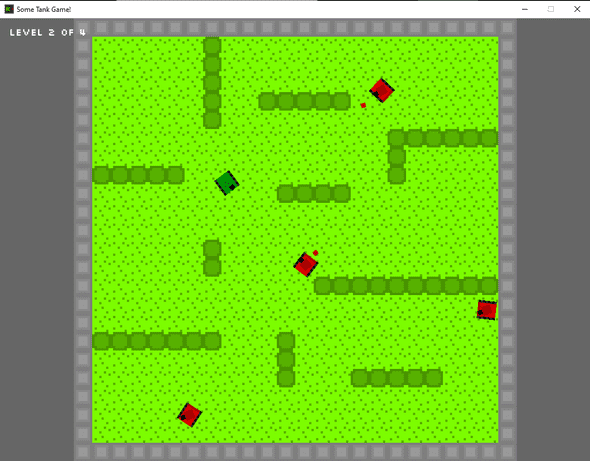
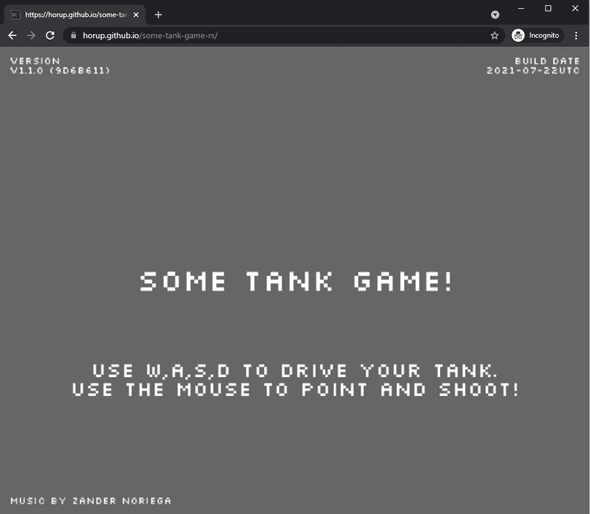
After less than two hours of working, I got my game to successfully run in the browser and made a pipeline in github which builds and deploys the game to Github pages !!!

some tank game 2021 08 05 112614

Next step was to improve the experience by adding a spinner when loading the WASM module, preloading of assets when the WASM module was loaded and adding explicit touch support for Tablet support.

An issue I hit regarding Tablet support was that I could not get my game to reliable load on Android Chrome. Only if I attached the Chrome debugger could I get the game to run - huh?!?!. Firefox on mobile was OK.

After a lot of searching I found that Chrome 91 had a bug related to WASM loading. The Blazor guys were also affected by this bug which were discussed here.

Apparently, the Google guys fixed the issue in Chrome 92, which I successfully verified, but without really know the underlying issue and thus why the bug manifests in Chrome 91 - scary!!!

For the touch support, I had to be somewhat creative since winit, the windowing library bevy use, does not support touch events on mobile browsers. The solution I concocted was to implement touch events in JavaScript, collect the touch data and let Rust ‘pop’ the touch events - and then map these events to my input system.

For the touch support, I opted for a simple single-touch experience where one can drag a path for the tank to follow and then let an ‘autopilot AI’ handle the driving of the tank. Shooting is handled by simply tapping. Seems to work OK.

some tank game 2021 08 05 112834

Anyways - took me about 10 hours to port my game to the browser including touch support.

The game can be played here.

Rust is awesome!!!
Bevy in the Browser!

July 08, 2021 - Søren Alsbjerg Hørup

After finishing “Some Tank Game” and posting about it I wanted to see how, if possible, I could port this to the web without replacing Bevy.

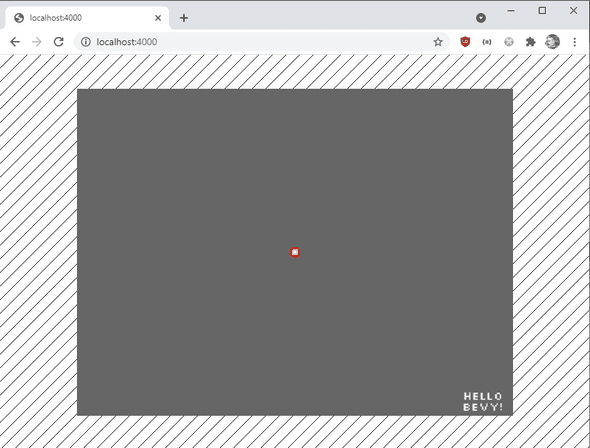
To get started, I spun up a fresh Bevy project to see if I could get rendering, kira audio, window management and Bevy UI to work in the browser.

It turns out I actually could!

hello bevy web

Source can be found here.

Firstly, not all of the features of Bevy is compatibile with the web, hence first step is to disable the default plugins when targeting web assembly.

This can be done through the Cargo.toml:

[target.'cfg(target_arch = "wasm32")'.dependencies] bevy = {version = "0.5", default-features = false, features = []}

Here we simply disable all optional features.

Secondly, Bevys default rendering backend does not support the Web, hence we need a ‘web specific’ plugin. Luckiliy, I found bevy_webgl2 which provides a webgl2 backend for bevy.

bevy_webgl2 = "0.5.2"

This dependency will pull in bevy_winit and thus allow for Window creation using a Canvas element, bevy_render for rendering and Bevy png support for png loading and displaying.

Thirdly, wasm-bindgen is used to generate the bindings for JavaScript and wasm-pack is used to compile a bundle targeting web using:

wasm-pack build --target web

My index.html simply loads the module as such:

<script type="module"> import init from './pkg/bevy_web_test.js'; var res = await init(); res.start(); </script>

One issue that a struggle with were the fact that my Canvas was fixed sized and unable to resize with the Window. I inserted some JavaScript to force the Canvas to a certain size, but this had no effect of the internals of Bevy - hence my stuff was not rendered properly.

winit apparently does not support this out of the box, so I implemented a web_canvas_resizer system that polls the dimensions of the window and ensures that the Bevy renderer has the correct size.

Lastly, I added a dependency to bevy_kira_audio and saw that kira more or less works out of the box in the browser. Only issue I had were the fact that Chrome will not play sound unless the Window has had some kind of interaction. I found this JavaScript snippet that works around the issue by tracking AudioContexts and ensuring they play when allowed to.

That’s is! Bevy is now running in the browser!

Next step for me is to merge these changes into some-tank-game-rs and see if I can get my game to run in the browser.

"Some Tank Game" - A game implemented in Rust using the Bevy engine

July 05, 2021 - Søren Alsbjerg Hørup

I Finished my first Rust Game - called “Some Tank Game”!

Source can be found here: https://github.com/horup/some-tank-game-rs

The aim of the project was to implement a full game (albeit a simple one) using Rust and using the Bevy game engine.

Why? More or less to prove my gut feeling that Rust is a great programming language to make computer games and that Bevy is an awesome engine with a lot of potential.

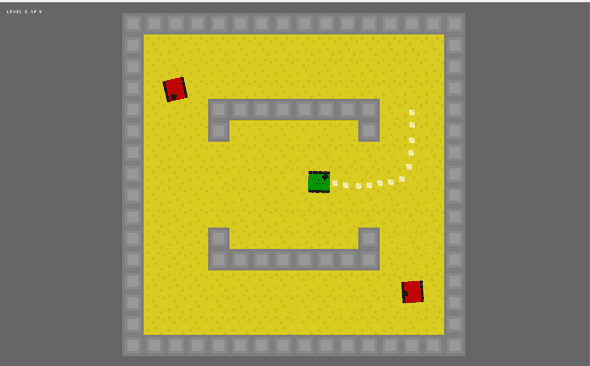
The game I implemented is nothing fancy, just a simple top down shooter. The game features four levels, pixel-art graphics, random collected sfx and music by Zander Noriega.

For fun, I tracked every hour I spent implementing the game, including play-testing, debugging, asset drawing, sfx searching, etc.

I started development the 27. of march and finished version 1.0 in the 2. of July. About 3 months of calendar development time. In this interval, I spent 65 hours in total or about 1 hour a day implementing the game.

I quickly got Bevy up and running and was able to draw some sprites. Bevy did not have tilemap support, so I implemented my own tilemap plugin which can render a tilemap consisting of many sprites batched into a mesh.

Bevys plugin system is really easy to work with. Simply define a struct and implement the Plugin trait and one can insert new resources, systems, etc. into Bevy.

The Entity Component System of Bevy is very non-verbose and easy to work with. Any struct (as far as I know) can be made into a component. Systems are implemented as plain functions and can be ‘wrapped’ as a system type for bevy to consume simply by calling <function name>.system(). This operation will fail at compile time if the function cannot be used as a system in Bevy, e.g. if it’s signature does not match the signature of supported functions. Systems run in concurrently and locking of resources are automatically handled. Great!

For the game I needed a collision detection and handling system. Bevy does not provide this out of the box, but due to the plugin friendly nature of Bevy, I quickly found a crate, bevy_rapier2d, that provides collision detection and response directly into the engine using rapier specific components and resources. Integration of this was a breeze! especially compared to implementing my own custom collision detection and handling systems.

For level editing, I used the excellent Tiled editor to construct my levels. Bevy does not support Tiled out of the box, but I found the tiled crate which provides generic Tiled support in Rust. I wrapped tiled in my own asset loader and ‘bam!’ I had Tiled support in Bevy. I later learned that bevy_tiled exists, which more or less does what I implemented - but hey, one less dependency :-)

Another awesome feature with Bevy is the build speed. By default, Bevy and the application compiles into a single ‘fat’ executable. This takes several seconds. However, Bevy also provides the ability to dynamically link to Bevy which reduces the compile times significantly.

I spent a lot of time getting Bevy UI to do want I wanted, specifically to render text in the correct positions and with the correct ordering. For a future projects I think I will opt-out of Bevy UI and instead use an immediate mode API such as egui through the use of the bevy_egui crate.

For sound and music playback I initially went with what was readily available in Bevy, which is more or less a single audio channel and the ability to schedule a wave, mp3 or ogg file to be played. However, I quickly realized that I needed the ability to loop music and also stop and restart a music track whenever a level ended either through a win or a loss. I found the bevy_kira_audio plugin which more or less replaces audio part of Bevy with the kira crate.

Lastly, I created a simple installer using Inno Setup which bundles my assets and executable into a self-extracting installer.

All in all, a fun project with the following post-project reflections:

  • Rust is an awesome programming language for Gamedev.
  • Bevy is an awesome engine for Gamedev currently only lacking in web support and maturity.

Next steps is to see if I can port the game to HTML5, which is one of the goals of the Bevy engine (although still in progress and not yet realized as far as I can see).

some tank game screenshot 1

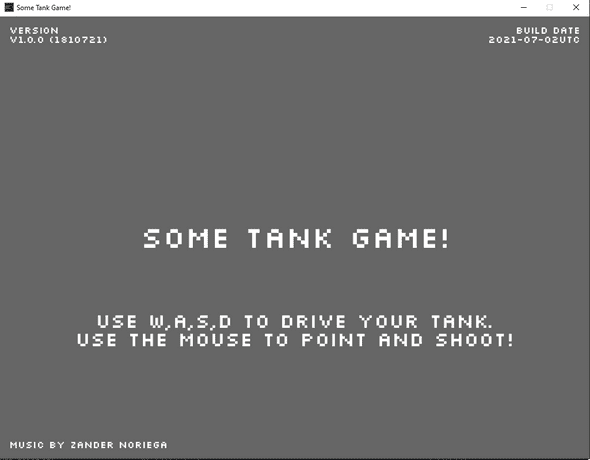
some tank game screenshot 2

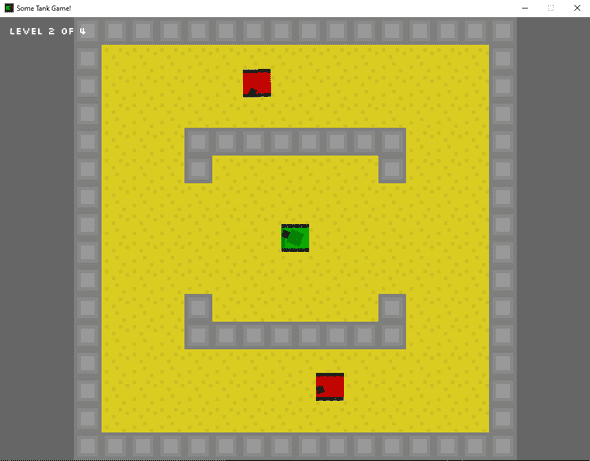
some tank game screenshot 3

Bevy - A Rust Game Engine

March 29, 2021 - Søren Alsbjerg Hørup

In the past months I have been focusing on using the Rust programming language in relation to game development.

I wanted a setup where I could implement a game that could build for both native, such as Microsoft Windows, and WASM, targeting modern browsers such as Chrome.

To achieve this I have been working on a pet project called Blueprint. Intention with Blueprint was to create a Rust template that could be quickly generated using cargo-generate and that provided several features out of the box. Features included:

  • 2d and 3d rendering.
  • many thousands of sprites using VBO batching.
  • entity component setup using Hecs.
  • pre-defined systems such as movement system, physics systems.
  • multiple template games such as platformer, shooter, etc.

My primary motivation was a template where I could quickly prototype game ideas using Rust. Previously I have been using Typescript + PIXI.js or THREE.js. But since I am a huge Rust fanatic, I wanted to see if I could conjure up a similar setup using Rust + libraries such as winit, wasm-bindgen, glow, etc.

Recently however, I stumbled upon Bevy, a data driven game engine written in Rust. Bevy more or less ticks all the boxes above, except for WASM support. I want to build my games such that they can be quickly shared in the browser for other to see, thus WASM is a non-optional thing.

However, it seems that WASM support is a focus area of Bevy and it seems it is currently possible to run Bevy in the browser using webgl plugins, atleast if one uses the master branch of github and not version 0.4 currently published on crates.io.

In any case. I have decided to put my own Blueprint project on hold and fiddle a bit with Bevy before continuing down a path which seems to be well underway by the community!

If all goes well, I can ditch my efforts on my own brewed Blueprint and make a Bevy template!

Reviving an old PHP website to fix SEO Issues

March 26, 2021 - Søren Alsbjerg Hørup

In 2007 I made a PHP website tailored for IE6 (yippee) that shows local rentable apartments. The site has been running flawlessly without any code changes now nearly 15 years.

Recently the client called me and asked why “his site was loosing rank position on Google”.

Naturally, my instinct told me the following:

  • Site was optimized for IE6, that is, not being valid HTML5.
  • Site is still not using SSL
  • Site does not follow modern SEO.
  • Site is not mobile friendly.


I took a deep breath and FTP’ed to the site to pull out all the PHP code such that I could create a local PHP development and get the site up and running.

First issue that was hit was my local PHP installation were a version 7.7 and the site was unable to run due to several deprecated functions, such as MySQL, resulted in missing functions and an un-renderable site.

The site was implemented using PHP 5.x and has never been updated since.

After a downgrade of PHP I got the site to work and found several things that needed to be fixed before the HTML markup was SEO friendly. A simple SEO check revealed several things:

  • Missing H1 headlines

    • Much of the site was made with div’s and tables.
  • Internal links with dynamic URL parameters

    • Some of these are unavoidable and needs to be fixed by e.g. nofollow.
  • 301 redirect of www. vs non-www domain.

    • non-www needs to be redirected to www. with a 301.
  • Language markup errors

    • The Markup needs to be updated from 4.01 Transitional to 5.0 and ensure all markup errors has been fixed.
  • Missing SSL encryption

    • Google now penalizes sites that don’t use SSL. Obviously, SSL needs to be enabled.
  • Missing viewpoint tag

    • Site looks horrible on mobile browsers.

Instinct was right yet again. :-)

Bubble Sort Benchmark in Rust

July 01, 2020 - Søren Alsbjerg Hørup

One of my colleagues have updated my Bubble Sort Benchmark with a Rust implementation, and the results are in!

> ./start.bat

> clang -O -fsanitize=address main.cpp   && a.exe
   Creating library a.lib and object a.exp
30125ms to sort 50000 elements 10 times (Vector)
22985ms to sort 50000 elements 10 times (Array)

> clang -O main.cpp   && a.exe
10281ms to sort 50000 elements 10 times (Vector)
9906ms to sort 50000 elements 10 times (Array)

> dotnet run --configuration=Release
32547ms to sort 50000 elements 10 times  (List)
15531ms to sort 50000 elements 10 times (Array)

> node index.js
28133ms to sort 50000 elements 10 times

> rustc -O main.rs -o rust.exe

> rust.exe
Took: 10.5915778s to sort 50000 elements 10 times

As seen, sorting 50k elements 10 times took 10.59 seconds using Rust. The C++ implementation was a tad faster at 9.9 seconds when using C arrays and 10.28 seconds when using std::vector. However, the C++ implementation does not guarantee against memory corruption, which is the case with Rust. The paid memory safety overhead of 3-7% in Rust, is in my opinion worth it.

Comparing the address sanitized version of the C++ array implementation, Rust is twice as fast fast: 10.59 vs 22.98 seconds. I believe this is due to the implementation of the sanitizer in clang, i.e. it needs protect every memory access, since C++ allows pointer arithmetic. Rust does not allow such programming behavior, unless wrapped in unsafe {}.

Compared with the node and DotNet core implementations of Bubble sort, the Rust implementation is between 50% (DotNet Array) and 300% (DotNet List) faster, which again is not surprising due to the restrictions of the Rust language: which allows for tight optimizations without introducing runtime checks (except for array out of bounds).

Rust is an awesome language and I definitely hope to see it succeed!

How to disable the Azure AD password expiration policy through PowerShell

June 22, 2020 - Søren Alsbjerg Hørup

We recently encountered a problem with our automatic tests of a cloud solution. The solution utilizes Azure AD as identity provider and currently holds several test user accounts used by our automatic tests.

The tests were green for several weeks, but suddenly turned red due to the password expired! No problem we thought, we simply disable password expiration for the test users in the AD - but after traversing the Azure Portal we did not find the ability to disable or change the password expiration policy (WTF!)

After some Googling, I came to the conclusion that it is not possible to change the policy through the portal but that it is possible through PowerShelling (Is this a term I can use :-P)

Firstly, the AzureAD module must be installed in PowerShell:

Install-Module AzureAD 

This will populate the PowerShell with Azure specific cmdlets.

Next, the specific subscription needs to be selected:

Select-AzureSubscription -TenantId <GUID>

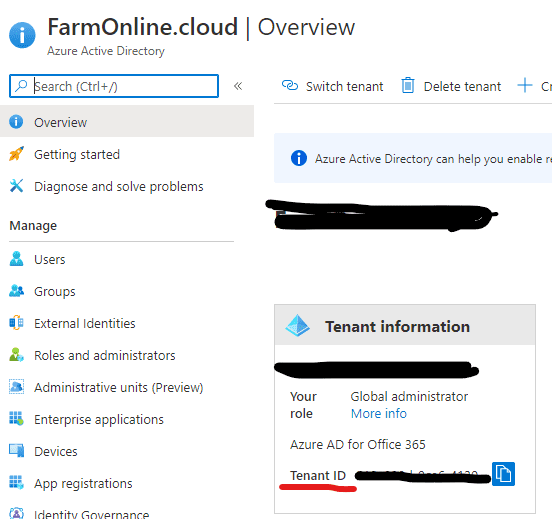
The GUID can be found Portal under Tenant ID:

annotation 2020 06 22 083340

Lastly, the following command gets the test user from the AD and sets the password policy to “DisablePasswordExpiration”:

Get-AzureADUser -ObjectId "testuser@XYZ.onmicrosoft.com") | Set-AzureADUser -PasswordPolicies DisablePasswordExpiration

That’s it! Password should no longer expire for the given user!

Bubble Sort Benchmark: C++ vs .NET Core vs Node

June 12, 2020 - Søren Alsbjerg Hørup

We recently hit a bottleneck in a visualization application that we are working on, specifically in the backed of the visualization app. The app consist of an ASP .NET Core backend, a CosmosDB for hot storage, Blob storage for cold storage and a React frontend to visualize both the hot and cold data.

We have the non-functional requirement (NFR) that data must be visible within 5 seconds (easy to test, hard to achieve). Our backend collects the data both from hot and cold storage and exposes this for the React fronted through a REST API. Works fine, but the NFR of 5 seconds are not achievable using this approach since the frontend will “hang” / “freeze” with a spinner until data is ready, which can easily take 20-30 seconds.

I had the idea of streaming data from the backend to the frontend and let the frontend do the processing of the data instead of the back end. While it would still take 20-30 seconds before the data was 100% visible in the frontend, we could at-least achieve the 5 second NFR since we are able to show the data as it is ready, which would greatly enhance the user experience.

The team was not fond of my idea, due to “JavaScript not being fast enough to process the data”. While this might have been true in the nineties, it is no longer true with the V8 engine powering the JavaScript of today. I decided to convince the team through a quick experimental benchmark where I would Implement Bubble Sort in C#/.NET Core and JavaScript/Node and compare the results. Oh, and just for the kicks, I did an implementation in C++ using Clang as compiler.

The source-code of the benchmark can be found on my Github: BubblesortBenchmark

For the benchmark, 50.000 elements are generated and bubble-sorted 10 times to avoid measuring “cold start”.

For the C++ benchmark, the clang compiler is used with optimization and without the -fsanitize=address flag. This flag will introduce bounds checking to make the C++ runtime comparable to that of C# and Node. The -O flag is also used to optimize the compiled code. Two bubble sort implementations have been done for C++, one using std:vector and another using arrays.

For the C# benchmark, DotNet Core 3.1 have been used with -configuration=Release flag to produce a optimized binary. Also for C#, two implementations have been one, one using List and another using a C# array.

For the JavaScript benchmark, a single implementation has been done using JavaScript arrays. Node v12 is used as runtime.

Now for the results!
Taken directly from the shell:

> clang -O -fsanitize=address main.cpp && a.exe 
Creating library a.lib and object a.exp 
30156ms to sort 50000 elements 10 times (Vector) 
22360ms to sort 50000 elements 10 times (Array)

> clang -O main.cpp && a.exe 
9984ms to sort 50000 elements 10 times (Vector) 
8859ms to sort 50000 elements 10 times (Array)

> dotnet run --configuration=Release 
28766ms to sort 50000 elements 10 times (List) 
14687ms to sort 50000 elements 10 times (Array)

> node index.js 
29131ms to sort 50000 elements 10 times

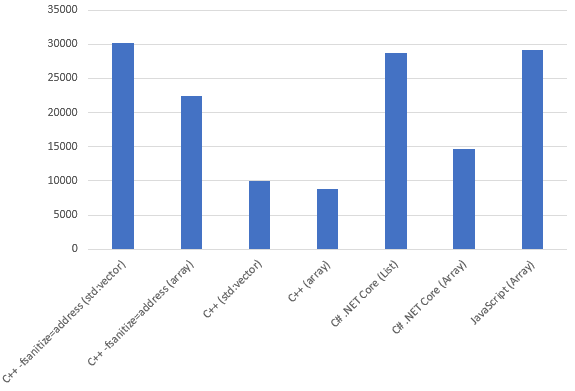
And visualized as bar graphs (lower is better):

2020 06 12 06 06 15

The results are not that surprising.

C++ without address sanitizer outperforms all other implementations. The reason is simple, the program does not check for out of bounds when accessing the array and will therefore save one or more instructions per array access, which for Bubblesort is O(n^2). std:vector and array are also comparable in performance since very little overhead is introduced with the std:vector abstraction.

C# .NET Core using List is nearly two times slower than C# .NET using arrays. This could be attributed to the fact that an array of Integers in .NET is guaranteed to be a continuous set of integers where a List boxes the Integers into objects introducing additional indirect access.

JavaScripts approach to arrays are similar to that of C# lists, which is also evident in the benchmark. Comparing the C# List and JavaScript Array implementations, they are nearly 100% identical! Compared this with the C++ std:vector implementation using address sanitize, all three “list like” implementations performs the same.

One surprising aspect is that C# .NET Core array outperforms all C++ implementations when guarded with the address sanitize flag. I believe this is due to the just-in-time compilation nature of .NET Core, since .NET might deduce that no range-checks are needed during the JIT compilation process and thus save several instructions.

All in all, a nice little benchmark that has convinced the team that we can surely due data processing using JavaScript if needed.

Next step could be, to look into the JavaScript implementation and see if it can be improved by using e.g. Object.seal to increase performance. Another aspect could be to introduce a similar implementation in Rust which I would expect performed the same as the C++ arrays implementation using address sanitizer.

Number of Views after moving to Gatsby

June 09, 2020 - Søren Alsbjerg Hørup

After moving my blog from Wordpress.com to my Gatsby powered blog, I ensured that all my links indexed by Google and backlinked from other sites were still valid by having redirects from the original urls to the new urls.

Yesterday, I did a quick analysis of my traffic that shows that my strategy was a success.

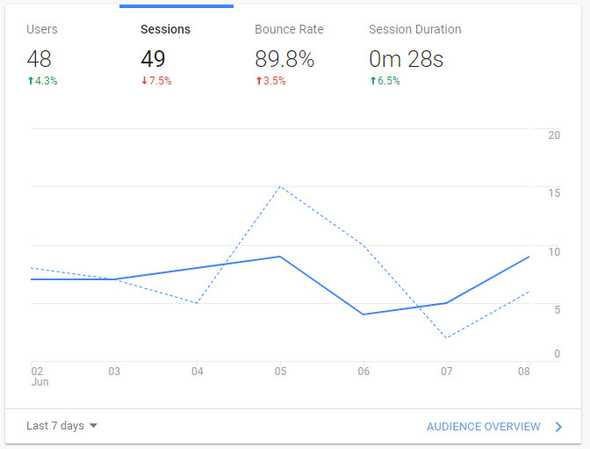
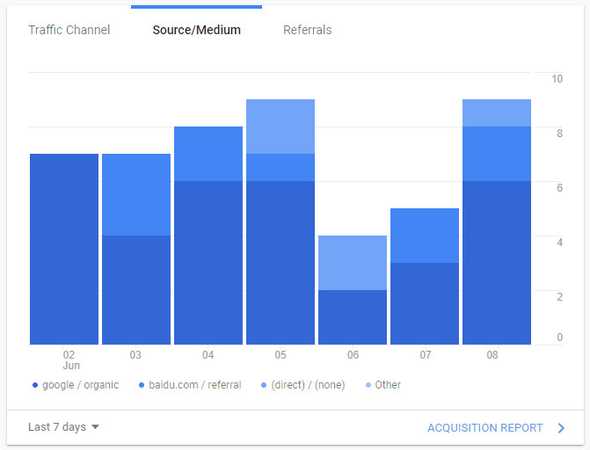
As seen on the following graph, I have about 49 sessions per week. Not much, but roughly the same as when I had my Wordpress.com blog running.

2020 06 09 05 52 14

Looking at my traffic sources, most of the traffic is organic from search engines, primarily Google. This indicates that my redirects from the existing index urls works as intended.

2020 06 09 05 52 52

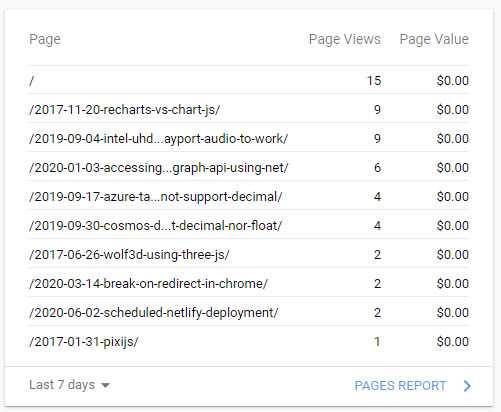
Finally, looking at the page report, I can see that my recharts and intel posts are still the most viewed, which was also the case for my Wordpress.com blog.

2020 06 09 05 53 17

All in all, the move did not affect my SEO negatively.

LBRY.TV a YouTube like experience powered by Blockchain

June 03, 2020 - Søren Alsbjerg Hørup

YouTube is the defacto “video platform” for users to upload video content. It’s centralized, fast, and simply works. However, as with everything centralized and controlled by a single company, in this case Google, it is subject to restrictions.

Restrictions imposed by YouTube on uploaded videos include: Videos with nudity / sexual content, videos encouraging other to do harmful things, videos whose material is copyrighted in some way, among others.

By having a centralized platform, these kinds of restrictions can be easily enforced. This kind of “censuring” has both pros and cons.

A big pro is that one entity controls the media and ensures safe content for the viewers of the platform.

A big con is that one entity controls the media and defines what is safe content for the viewers of the platform. In case of political videos, these might be deemed harmful or dangerous in some way imposing a kind of censuring of free speech.

In any case, to solve the issue of censuring, only one viable strategy seem to stick: de-centralize the platform and make sure it is not controlled by any single entity

In case of YouTube, an alternative exists called LBRY.TV.

LBRY.TV is website similar to YouTube where one can search for videos, subscribe to channels, create channels and upload videos. LBRY.TV is controlled by LBRY Inc, a company, thus is in fact no different from how Google controls and owns YouTube. LBRY.TV does enforce a kind of censoring of what is exposed, such as illegal or infringing content. LBRY.TV is a centralized application, just like YouTube.

The similarities stops there, however. LBRY.TV leverages the LBRY blockchain, which is a ledger/index over content uploaded to the LBRY network. The blockchain contains information such as the type of media, e.g. “video/mp4”, the title of the video, description, author and the stream-hash. Similar to bit-torrent, the LBRY content network is a P2P distributed system and uses the stream-hash to locate the blobs for the consumer to stream.

Since a block-chain is used, removing information from the chain is next to impossible, which also includes censoring of content. Only the applications leveraging the block-chain can censor content. Furthermore, the actual content is stored in a P2P manner on LBRY content servers, similar to seeders in a BitTorrent network, meaning that the actual content is only removed if it is removed from all the servers and seeders in the network. Similar to BitTorrent, consumers/peers help the network by seeding videos to others.

Performance and user experience of LBRY.TV is not on par with YouTube, since when watching videos there is a substantial “lag” before the video is being played. The primary reason for this is definitely the fact that peers serving the video must first be found and connected to before the streaming can commence. Content-wise, we are not their yet either. But given the age of the application and protocol, this is to be expected.

In any case, the future holds more distributed, free and open services thanks to the guys behind LBRY.

Scheduled Deployments for Netlify using Github Actions

June 02, 2020 - Søren Alsbjerg Hørup

I am working on a Gatsby site which sources my weight data from a google spreadsheet to generate a site which shows my weight trend. The spreadsheet is updated every morning, typically at 06:00, where I record my weight.

Netlify does not automatically build and deploy when the spreadsheet is updated, since Netlify does not know that the spreadsheet is updated. The simplest approach is to schedule a build and deployment of the Gatsby site every day, such that new weight data is automatically sourced, deployed and thus made public.

Netlify does not provide any means to schedule deployments. As far as I can see, Netlify only supports git push triggering and build hooks. Build hooks are an unique URL triggered by, e.g. Curl, starting a new build & deploy.

This hook can be called in a schedule manner, thus enforcing a scheduling of the build and deployment in Netlify.

The simplest approach I have found is to use Github actions to invoke the build hook with Curl. The following action calls the web hook every day at 8:00 UTC.

name: Every day

on:
  schedule:
    - cron: "0 8 * * *"
jobs:
  build:
    runs-on: ubuntu-latest
    steps:
    - uses: actions/checkout@v2
    - name: POST hook
      run: curl -X POST -d {} https://api.netlify.com/build_hooks/{UNIQUE_HOOK_ID}

With this in place, Github will trigger a build & deploy in Netlify without requiring any push to the repository.

Overclock profile for the Asus GTX 970 Strix

May 29, 2020 - Søren Alsbjerg Hørup

My stationary PC at home is getting quite old. It features a quad core i5 3570 CPU, 8GB of ram, 1TB SSD and an Asus GTX 970 strix GPU. I have been postponing an upgrade since most of the games I play are fine on this rig anyway, with adequate FPS and loading times - oh, and I am not really a gamer.

GTX 970 strix from Asus

But anyway, I recently tried The Outer Worlds game and was hit by performance issues. Looking at the metrics it seemed my GPU was the bottleneck. To fix, I investigated if I could overclock it at a bit to achieve the 60 frame per second I wanted without sacrificing too much graphical fidelity. Long story short, I could not achieve 60 fps but I did increase GPU performance by 10% without stability issues, which is obviously better than nothing.

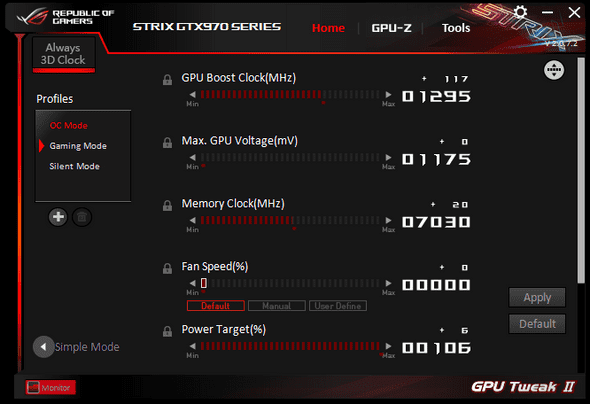
The GTX 970 from Asus has a stock GPU boost clock of 1178 MHz and memory clock of 7010 MHz. After a bit of fiddling, trial and error, computer crashes, etc. I manage to overclock the card to 1295 (+117) and 7030 (+20) without any stability or crash issues.

Overclocking of the Asus GPU can be done by using Asus’ own overclocking application: GPU Tweak II, which can be downloaded here: https://www.asus.com/us/site/graphics-cards/gpu-tweak-ii/

A screenshot of my profile setting can be seen here:

Asus GTX 970 overclocked a bit

Not all cards are the same, as such not all cards can be overclocked to the same degree. My suggestion is to try my settings, see if they are stable, if not reduce the clock speed a bit.

Good luck overclocking!

Cura Profile for Miniature Printing

May 28, 2020 - Søren Alsbjerg Hørup

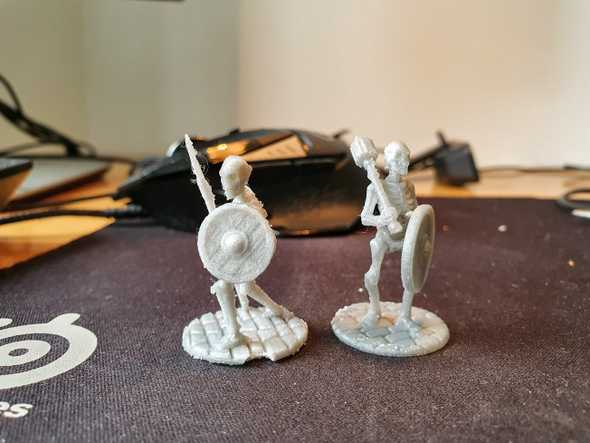
I own the F5 Cube Large 3D Printer from the Chinese company of FLsun. I use this printer to print fun / non-productive objects, primarily toys for my kids. To calibrate the printer, I have printed a-lot of D&D and Battletech miniatures, such as these 3D printed skeletons:

3D printed skeletons

Initially, the printer was not able to produce a miniature of this quality. I used a-lot of my time tweaking the settings and even upgrading the printer with a parts-cooler to get acceptable results. What is seen above is what I believe to be the optimum the printer can produce with the known limitations of Fused Filament Fabrication (FDM) printing.

The profile I made for CURA can be downloaded here: Link to Profile

I did several adjustments to the stock profile of CURA to be to print miniatures of decent quality. The most important described below. The profile assumes a nozzle size of 0.4mm - it might be adaptable to lower nozzle sizes, but I have not tried this myself.

The profile uses 0.08 as layer height
Generally, the smaller the better.
A fine layer height will produce better results in all my test cases.
For some minis, 0.12 is also OK

Print speed is set to 30 mm/s
Print speed has a big impact on the quality of the print.
Some minis can be produced with decent quality when using a faster print speed, such as the stock 60 mm/s, but I would leave it very low.

Initial layer speed is set to 20 mm/s
This is primarily to help with adhesion to the build plate.
I use a glass bed with no glue.
Set this to whatever works for you.

Enable Print Cooling
A print cooler is a must if you wish to produce decent quality minis.
I initially tried without a print cooler, and was never able to produce a quality which I found decent.
I use 100% fan speed with a minimim layer time of 10 seconds

Supports depends
I typically use supports, specifically the Experimental Tree Supports in CURA.
The choice of supports depends on the mini to be printed.

Temperatures
I use an initial temperature of 230C to get good adhesion and then 205C as printing temperature. My build plate is set to 60C. I believe this setting depends very much of the printer.

Enable Retraction
Be sure to enable the retraction of the print head to avoid too much stringing.
I found a retraction distance of 6.5 mm and a retraction speed of 50 mm/s to be a good setting.

Infill Density
I have mine set to 10% which I have found adequate for all my miniature prints.

Word of caution: 3D printing can eat up alot of your time, especially when printing minis :-)

Speed comparison of the new and old blog

May 25, 2020 - Søren Alsbjerg Hørup

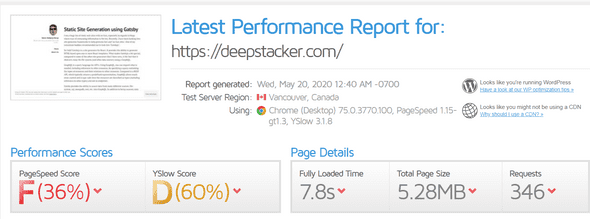
Before migrating from Wordpress.com to my GatsbyJS site, I did a website speed comparison using GTmetrix.com which runs PageSpeed and YSlow tests to determine the speed score of a site.

Performance report of my Wordpress blog

As seen, my Wordpress.com site was not exactly a high scoring blog on the Internet. To be fair, I never did anything to improve the performance of the site.

Performance report of my new GatsbyJS blog

The new GatsbyJS site performs extremely well out of the box, much better than my Wordpress site. The comparison is not even an apple to apple comparison, since for the Wordpress site, I only loaded a few of the blog posts on the initial load. For the Gatsby site, I generate an Index file containing ALL my blog posts! The latter allows searching on the site using the browser search, which is just plain awesome.

For the Wordpress.com blog, blog posts were lazy loaded as the browser scrolls down. For the Gatsby blog, images are lazy loaded as they are shown. Looks a bit strange, but the responsiveness (as in performance) is a huge win.

The YSlow score could be better, buuut I think I will put that on my endless todo list for another time :-)

Migrated to Gatsby

May 21, 2020 - Søren Alsbjerg Hørup

I initially started this blog the 3rd of January 2017 on WordPress.com, which is a hosted / SaaS / platform of the open source WordPress CMS: https://en.wikipedia.org/wiki/WordPress.com I just needed a place to blog, nothing more and nothing less, with no clear requirements on plugins, speed nor look and feel.

Early 2020, I heard about GatsbyJS from one of our DevOps consultants, a static site generator that leverages React to generate “blazing fast sites”. GatsbyJS sources data from one or more data sources, transforms the data, exposes the data through GraphQL and generates one or more webpages using server side React that can be deployed to CDNs (Content Delivery Networks) such as Netlify, GitHub Pages, or any web server that can serve static files. In addition, the static pages are ‘rehydrated’ after rendering in the browser, allowing React to be used in the DOM even though the site is pre-rendered and served as ‘static’ files.

This has many benefits:

  • Serving HTML directly to the browser via a CDN is very cost-efficient, due to the distributed nature of CDNs and due to the static files being static and thus highly cache-able. This is harder to achieve when using server side generated pages, since a server is responsible for generating the pages upon requests from a browser.

  • The browser can ‘stream the resources into the DOM’ while downloading, to provide an early partial rendering of the page. This makes the speed of the website seem very fast, since the DOM is changing the moment the user enters the site. SPAs (Single Page Applications), such as many React apps, typically lack this behavior since they need to download a JavaScript bundle, manipulate the DOM and then display the resulting page, which can easily take a few seconds.

  • Compared to a SPA, since the page is statically generated, the initial DOM is contained in the HTML files and thus easier for Google and other search engines to traverse, increasing the ‘SEO Score’ of the site.

  • Dependent resources, such as images, can be transformed before being outputted to fit the generated page, e.g. a 4K image can be transformed to fit the 800px of a div without requiring manual image manipulation software.

There are drawbacks as well:

  • Since the site is ‘static’ no dynamic behavior from the server can be achieved, only DOM manipulation from a client side library such as React can change the page after initial rendering. GatsbyJS uses the re-hydrate feature of React to enable ReactDOM after the initial page rendering, but if the site is primarily consuming a data source which is server side, such as an SQL data source, React in the browser has no chance of consuming this and can thus not update the site.

  • Updating the site with new changes to the server side data sources requires a rebuild of the site and upload of all the static resources. This can easily take minutes when doing a big site, meaning that content update is not visible to the user before a new deployment (like the good old days :-P)

  • If using CDNs, there can be a delay between the upload of the site and the propagation through the network.

In any case, May the 11th I started migrating from WordPress.com to a ‘Gatsby generated site’. To achieve this, I had to do several things:

  • I needed to export and import all my WordPress blogs into a format GatsbyJS could understand. GatsbyJS can source data from Markdown and transform this into HTML, so I decided to leverage this functionality and convert all blog posts into Markdown using a mixture of homebrew and standard tools (a blog post on its own)

  • I needed to implement the blog using React and hookup the markdown data source. Luckily for me, the blog starter provided this out of the box: https://www.gatsbyjs.org/starters/gatsbyjs/gatsby-starter-blog/ and I could simply copy and paste :-)

  • I needed to implement tag support, since this was not provided by the blog starter and my WordPress site uses tags.I had to extend the markdown with tags and extend the gatsby-node.js file such that ‘tag pages’ could be generated. (also a post on its own)

  • I wanted a look and feel similar to my WordPress site, so I made several smaller adjustments to the way the site was generated, with the primary adjustment being that all posts are served from /index.html including the content of the blog posts. Lucky me, the blog starter do lazy loading of all images so I simply output all blog posts without issues. This might not scale when I have 1000+ posts, but hey! that’s a problem for a future time.

  • I needed a simple way to update my site with new blog posts. A bit of googling and I found Netlify-CMS, an open source SPA that can be embedded into a site and be used to read and write markdown directly into GIT. (also a post of its own)

  • I needed a place to put my generated site. Initially I had chosen Github, but with the googling of Netlify-CMS I decided to tryout Netlify and host my site there.

  • Lastly, I needed to redirect my routes such that when I point Deepstacker.com to Netlify, Google gets a 301 in its face when asking for paths from the old WordPress site. Netlify supports the writing of a _redirects file, where one can redirect from X to Y, making it easy to enforce a redirect from the WordPress format to the new Gatsby format.

That’s it! My Gatsby blog is now alive.

Stuff I still need to do:

  • Fix some conversion errors in the old blog posts
  • Add the ‘about me’ page, which I have not yet moved from WordPress.
  • Improve look and feel a bit more after getting some feedback.
  • Improve SEO
  • Analyze the speed of the site and fix potential bottlenecks.

Static Site Generation using Gatsby

May 11, 2020 - Søren Alsbjerg Hørup

I am a huge fan of static web-sites with no fuss, especially in regards to blogs where ease of consuming information is the key. Recently, I have been looking into site generator frameworks to help generate fast and ‘no fuss sites’. One of my consultant buddies recommended me to look into ‘Gatsbyjs’.

So I did! Gatsbyjs is a site generator for React. It provides the ability to generate HTML based upon one or more React templates. What makes Gatsbyjs a bit special, compared to some of the other site generators that I have seen, is the fact that it abstracts away the file system (and other data sources) using a GraphQL.

GraphQL is a query language for API’s. Using GraphQL, one can request what is needed, including references to other resources, by specifying a query containing the types of resources and their relations to other resources. Compared to a REST API, which typically returns a predefined representation, GraphQL allows much more control and is type-safe since the resources are described as types (including references to other types) and not as endpoints .

Gatsby provides the ability to source data from many different sources: file-system, sql, mongodb, rest, etc. into GraphQL. In addition to being sourced, data can also be transformed, e.g. Markdown can be parsed for easier consumption, images can be optimized for the web, etc..

Pages can be generated in many ways. Simplest way is to put a React component into src/pages, which in turn is rendered to HTML and copied to output. Pages can also be generated programmatically, using the createPages API, or by importing a plugin.

Pages can run GraphQL queries that return data previously sourced, allowing the page to be populated with data from the GraphQL server and in turn statically generated and saved in one or more HTML files.

Gatsby also supports Reacts concept of “hydrate”, making it possible to add client-side React to a static generated page and thus provide app like functionality when all JS files have been loaded.

Next step for me is to try to implement this Blog using Gatsbyjs and see how it performs and manages - and if the results are good! Move my blog 100% to Gatsbyjs.

Style Transfer using Deep Learning

May 04, 2020 - Søren Alsbjerg Hørup

I recently experimented with deep learning algorithms using TensorFlow and Python. A cool use-case I found was to transfer the style of one image onto another image. This can be achieved using a “Neural style transfer” model, which extracts the style of image A, the “semantics” of image B and constructs a new image C with the style of image A and the semantics of image B.

For fun, I did a quick implementation using the Neural style transfer module found here, using Python and Tenserflow:

https://tfhub.dev/google/magenta/arbitrary-image-stylization-v1-256/2

Without much tweaking, I got some fun “paintings” as seen below.

1

2

3

6

8

Next step is to port the model to Tensorflow.js and see if I can run the model in the browser and generate similar results!

Hangfire - .NET background processing made easy

April 29, 2020 - Søren Alsbjerg Hørup

The cloud project I am currently working had the requirement that we needed to ingest, process, and write several gigs of data in a CosmosDB every 15 min.

For the processing part, we needed something that could scale, since the amount of data was proportional to the number of customers we have hooked up to the system.

Since the project consisted mainly of C# .NET Core developers, the initial processing was done using C# using async operations. This worked well, but was not really scalable - one in the team suggested to use Hangire.io for the processing, which turned out was a great fit for our use case. (Wished it was my idea, but it was not…)

Hangfire is an open source .NET Core library which manages distributed background jobs. It does this by starting a Server in the application where jobs can be submitted. Job types include: fire and forget, delayed jobs, recurring jobs, and continuations.

Hangfire uses a database to ensure information and metadata about jobs are persisted. In our case, we simply use an Azure SQL server. Multiple instances of the application hosting the Hangfire server helps with the processing of the jobs.

This architecture makes it possible to e.g. submit a job for each connected customer, which is processed by one or more nodes. If resources becomes a problem, we horizontal scale up the application to include more instances - which can even be done automatically depending on CPU load or other metric. In our case, we use Kubernetes for that.

What I really like about Hangfire is the fact that one can simply start with one instance of the application hosting the Hangfire server, and scale up later if needed.

Oh! and Hangfire comes with its own integrated dashboard that allows one to see submitted jobs. Neat!

Although we are not yet in production, my gut feeling is good on this one. Highly recommended!

3D Printing with the FLSun XL Cube FDM printer

April 08, 2020 - Søren Alsbjerg Hørup

The latest addition to my repository of hobbies is that of 3D printing. December 2018, I bought the FLSun XL Cube 3D printer for my dad as a Christmas gift.

The FLSun XL Cube 3D FDM printer is a Chinese “assemble yourself” kit with a big print volume of 260 × 260 × 350 mm. My father managed to assembly the printer, but he never really got it to print great results.

A month ago I got the printer from him and have been doing tweaks and upgrades here and there. Upgrades include:

  • Raspberry Pi runnig Octoprint, such that I can send prints directly to it from my PC without resorting to SD card swapping!
  • A USB camera to watch the print-bed and to do time-lapse videos
  • A new self-printed carriage to hold the hothead
  • A part cooler to cool the printed parts.
  • A filament cleaner (a sponge in which the filimant travels to remove dust)
  • A glass bed to increase adheasion.

The setup looks like this (sitting in my shed):

20200408 094352

Raspberry sitting on the front beam to the left,
camera on the left beam in the middle

20200408 094356

In addition to the hardware upgrades above, I have done a lot of tweaking of my CURA profile by primarily printing miniatures from D&D and Battletech. (yeah I know, I am a geek)

All in all, with my hardware upgrades and software tweaks, the FLSun XL Cube Printer can do amazing stuff.

Tagged: FDM Hobby

Babylon.js

March 20, 2020 - Søren Alsbjerg Hørup

I have always been a big fan of THREE.js, a 3D JavaScript library that abstract away some of the complexities of OpenGL. Recently, I tried another library, Babylon.js, written in TypeScript and ofcourse for the browser.

I found Babylon to be on par with THREE on all the areas I needed, except for Camera control where Babylon really shines with it’s built in support for many different types.

Looking at npmjs.com, it’s clear that THREE today the ‘go to library’ when doing 3D in the browser. Currently THREE has 304k downloads a week, while Babylon.js has less than 6k of downloads a week, clearly THREE is more popular.

Size wise, I have not done any test on the produced bundle. I find this absurd in today’s world, where a website does a million AJAX request to load commercials anyway…

The only reason I recommend THREE over Babylon.js is because of it’s popularity on npm. Else, go with any library - they both solve the three-dimensional problem equally well in my opinion.

Don't Trust SameSite defaults in Chrome

March 18, 2020 - Søren Alsbjerg Hørup

I had a hard time to reproduce the SameSite cookie issue between multiple Chrome browsers. The reason, as it would seem, was the the Default setting of the SameSite flags are NOT neccesarly the same between Browser instances.

image

My Chrome on my PC reported “Cookies without SameSite must be secure” to be enabled with default checked, while on my collegues PC, it reported as being disabled with default checked.

This made it impossible for him to reproduce the issue that I had an easy time to reproduce. We had the exact same version of Chrome and were both using Windows 10, although not exact same version of Windows.

Lesson learned: Do not trust the Defaults in Chrome when debugging, enfore the same settings across instances.

Break on Redirect in Chrome

March 14, 2020 - Søren Alsbjerg Hørup

I recently had to debug an issue where the browser redirected the user. Debugging this was a pain, since the browser would clear all my views in developer console whenever the redirect happened.

I thought there must be a better way and yes! a bit of googling and I found this Gem:

window.addEventListener("beforeunload", function() { debugger; }, false)

This will break whenever the beforeunload event is executing, which happens right before a redirect.

Simply copy and paste into the console, and you are good to go!

This allowed me to see the exact call-stack leading to the beforeunload event.

In my concrete case the issue was related to a Cookie not being set due to SameSite not being set in a Cookie, which is a requirement by Chrome since version 80.

Using Cypress to do RPA

February 20, 2020 - Søren Alsbjerg Hørup

Introducing automation is something I am extremely keen on. Recently, I have been using Cypress at work, an end-to-end testing framework for browser based applications.

I got the idea that Cypress could be used to do Robot Process Automation (RPA) through the use of GitHub actions. My idea was to:

  • Implement a Cypress test suite which opened a specific website.
  • Traversed the website, to find meaningful data.
  • Email the data.
  • Let GitHub actions start the process.

I look at the bond prices every day on Nasdaq to get an indication on which direction my mortgage is going. A good candidate to automate: let Cypress look at the mortage and send me the result on email such that:

  • I do not have to remember to check every day
  • I do not have to access the site manually and spend time on this.
  • I get the result every day at a specific time, e.g. 10:00..

Implementation is super simple, write a test that opens the specific Nasdaq page, selects the element of interest and then emails the element of interest to me using an email client. For my tests, I used mail-slurp since it is free and works well.

The complete cypress code is here:

/// <reference types="cypress" />
import { MailSlurp } from "mailslurp-client";

let last = undefined;
const TO = Cypress.env("TO");
const API\_KEY = Cypress.env("API\_KEY");
const mailslurp = new MailSlurp({apiKey:API\_KEY});
const from = Cypress.env("FROM");

context('Actions', () => {
    it("Open Nasdaq", ()=>
    {
        cy.log(MailSlurp);
        cy.visit('http://www.nasdaqomxnordic.com/bonds/denmark/microsite?Instrument=XCSE0%3A5NYK01EA50');
    });

    it("Find Last", ()=>
    {
        cy.get(".db-a-lsp").should((e)=>
        {
            if (e != null)
            {
                last = e.first().text();
            }
        });
    });

    it("Email Last", async ()=>
    {
        //cy.log(last);
        await mailslurp.sendEmail(from,
            {
                to:\[TO\],
                subject:'0.5% kurs ' + last,
                body:last
            }
        ); 
    });
});

Quick and dirty. Three actions are defined:

  • Open Nasdaq: simply opens the URL in question.
  • Find Last: finds the price of the latest sale of the given bond.
  • Email Last: emails me the result

Simple as that. Running the “test” does exactly that. To automate, I use GitHub actions to start Cypress on every push but also every day at 09:00 UTC time.

I will definitely try to identify more use cases where this can be applicable in the future.

Pulling a new image in a Container App Service

January 21, 2020 - Søren Alsbjerg Hørup

Containers are now first class citizens in App Services. A Container App Service can be created with a specific image that is pulled from DockerHub or other registry.

Pulling the image only happens when the App Service is started or restarted. Pulling the image automatically seems not to be supported, meaning that one has to manually restart the App Service every-time the image has been updated and needs to be re-pulled.

Luckily, App Service exposes a Webhook which will pull the latest image and restart the container if necessary. This can be enabled by setting Continuous Deployment to On. Afterwards, the Webhook URL can be copied and used as part of a CI/CD pipeline.

image 3

The URL has the form:

https://${appservicename}:{password}@{appservicename}.scm.azurewebsites.net/docker/hook

The webhook uses basic authentication. POSTing to the URL will pull the latest image. curl can be used for this purpose as such:

curl --data '' https://\${appservicename}:{password}@{appservicename}.scm.azurewebsites.net/docker/hook

Note: Remember to escape the dollar sign if using a Bash Shell

For CI/CD, this can be easily integrated. Example from one of my github projects:

name: Dockerize
on: [push]
jobs:
  build:
    runs-on: ubuntu-latest
    steps:
    - uses: actions/checkout@v1
    - name: Login to Docker
      run: docker login -u ${{secrets.DOCKER_USERNAME}} -p ${{secrets.DOCKER_PASSWORD}}
    - name: Build the Docker image
      run: docker build . --file Dockerfile --tag horup/outfitty:latest --tag horup/outfitty:$(date +%s)
    - name: Push the Docker image
      run: docker push horup/outfitty
    - name: Trigger App Service
      run: "curl --data '' ${{secrets.APP_SERVICE_WEBHOOK_URL}}"

Here, the last step posts empty data to the Webhook URL. Note that the URL is kept in a secret in Github due to it containing basic authentication credentials. Also remember to escape the dollar sign when keeping this as a secret.

That’s it!

Accessing The Microsoft Graph API using .NET

January 03, 2020 - Søren Alsbjerg Hørup

I recently needed to fetch all users contained within a Microsoft Azure Active Directory tenant from within a trusted application running on a Windows 10 computer.

For this, I implemented a .NET Console Core console application that utilizes the Microsoft Graph API to fetch the needed data.

Microsoft provides NuGet packages that makes this a breeze. Assuming the application has been registered in Azure Active Directory and a Client Secret has been created, access can be obtained by constructing an IConfidentialClientApplication object using ConfidentialClientApplicationBuilder like so:

IConfidentialClientApplication confidentialClientApplication = ConfidentialClientApplicationBuilder
   .Create(clientId)
   .WithTenantId(tenantId)
   .WithClientSecret(secret)
   .Build();

Where clientId is the Guid of the application, tenantId is the Guid of the Azure Active Directory Tenant and secret is the client secret. The IConfidentialClientApplication and ConfidentialClientApplicationBuilder types are exposed the Microsoft.Identity.Client NuGet package.

To Access the Graph API, a GraphServiceClient must be constructed. This object provides properties and methods that can chained to construct queries towards the API.
This type is provided by the Microsoft.Graph NuGet Package.

GraphServiceClient needs an instance of a IAuthenticationProvider for it to be able to get an access token.
Microsoft provides ClientCredentialProvider which takes our IConfidentialClientApplication as parameter. ClientCredentialProvider is provided by the Microsoft.Graph.Auth NuGet package.

IAuthenticationProvider authProvider = new ClientCredentialProvider(confidentialClientApplication);

image

Note: The Microsoft.Graph.Auth package is currently in preview. Make sure to check “Include prerelease” to be able to find this package if you use the NuGet Package Manager in VS2019

Since ClientCredentialProvider implements the IAuthenticationProvider interface, we can now instantiate the GraphServiceClient

GraphServiceClient graphClient = new GraphServiceClient(authProvider);

With this, we can do queries towards the graph API. The following example gets all users of the Active Directory and returns these as an IGraphServiceUsersCollectionPage for further processing.

IGraphServiceUsersCollectionPage users = await graphClient.Users
   .Request()
   .Select(e => new {
      e.DisplayName,
      e.GivenName,
      e.PostalCode,
      e.Mail,
      e.Id
})
.GetAsync();

That’s it! Remember to provide the needed API Permissions for the application if you intent to execute the query above:

image 1

Cosmos DB does not support Decimal, nor Float

September 30, 2019 - Søren Alsbjerg Hørup

Similar to the Table Storage post, Cosmos DB does not support Decimal.

But It does not even support single precision points only double precision points.

Not a big issue, but if floats are used these are ignored and not converted automatically to doubles, meaning the data is not persisted.

Azure Table Storage does not support Decimal

September 17, 2019 - Søren Alsbjerg Hørup

As the title suggests, Azure Table Storage does not support the Decimal fixed-point type of .NET. One needs to be very aware of this, since no warnings or errors are provided when using the Table Storage API.

I have just spent an hour trying to figure out why my decimal values were all zeroed out when retrieving the rows back from the table. Changing decimal to double fixed the issue.

For my application, double is fine, but for applications requiring fixed point arithmetics this is definitly a con.

As far as I can see, CosmosDB has the same limitation.

Oh well…

Copy microk8s.kubectl config to Windows kubectl

September 10, 2019 - Søren Alsbjerg Hørup

For testing purposes, I recently installed Kubernetes on an Ubuntu Server VM, running on my XEN Server, through the use of the Microk8s package:

https://microk8s.io/

Installation was a breeze, and I quickly got Kubernetes up and running and was able to interact with it using microk8s.kubectl. Microk8s.kubectl is a version of kubectl having it’s own configuration pointing to the locally installed Kubernetes. This avoid conflicting with the standard kubectl which would have had its configuration overwritten by the microk8s package.

On my Windows developer PC, I wanted the ability to access the cluster using kubectl without having to run microk8s.kubectl through an SSH session.

To do this, one first have to find the kubectl config yaml file. This resides in the %userprofile%\.kube directory. If the file is not there, create it.

Configuration of the file to match that of microk8s.kubectl can be done copy paste the configuration of microk8s.kubectl and replace localhost with the external IP of the cluster. This can be done through SSH using the config view command.

$ microk8s.kubectl config view

apiVersion: v1
clusters:
- cluster:
    server: https://<externalip>:<externalport>
  name: microk8s-cluster
contexts:
- context:
    cluster: microk8s-cluster
    user: admin
  name: microk8s
current-context: microk8s
kind: Config
preferences: {}
users:
- name: admin
  user:
    password: <password>
    username: admin

Now, copy paste to the config file on Windows, and replace localhost with the external IP of the cluster.

In addition, if the SSL certificate is untrusted on the cluster (which it typically is), make sure to add insecure-skip-tls-verify: true under the cluster part.

The final config file should look like this:

apiVersion: v1
clusters:
- cluster:
    insecure-skip-tls-verify: true
    server: https://<externalip>:<externalport>
  name: microk8s-cluster
contexts:
- context:
    cluster: microk8s-cluster
    user: admin
  name: microk8s
current-context: microk8s
kind: Config
preferences: {}
users:
- name: admin
  user:
    password: <password>
    username: admin

If everything is well, executing kubectl get services on Windows should return at-least the Kubernetes service.

Intel UHD Graphics 630: Getting Displayport Audio to work

September 04, 2019 - Søren Alsbjerg Hørup

I have a Lenovo ThinkCentre M720q that I use for entertainment purposes mounted besides the flat-screen TV at home. This works wonders, except that I could not get the darn HDMI audio to work.

As workaround, I used a mini-jack cable to connect the PC and the TV. This is OK, but the noise from the mechanical fan is transmitted over the wire to the TV and thus amplifying the noise a bit.

Annoying to say the least!! especially considering the fact that the PC should indeed support Audio over Display-port / HDMI.

In the weekend, I decided that I would experiment in getting the audio to work. And I succeeded!

Firstly, I identified the embedded graphics adapter of the PC to be an Intel UHD Graphics 630. For an integrated graphics adapter, OK high end.

Next, I updated the driver of the graphics adapter from the standard driver delivered by Lenovo. Not directly possible it would seem since installing the official Intel driver was blocked by the installer with a message “Contact the PC manufacturer for support”.

I was not able to locate any newer driver on Lenovos website. Instead, I unpacked the Intel driver and forcefully updated the graphics driver using Windows Device Manager (and braced myself for a blue-screen of death). Steps:

  • Enter Device Manager
  • Find the Display adapter under Display Adaptors
  • Right click and click Update Driver
  • Then Click “Browse my computer for driver software”
  • Then Click “Let me pick from a list…”
  • Then Click “Have Disk” and find the folder where the Intel driver was unpacked.
  • You should then be able to select the new driver.

If everything goes according to plan, the screen should flicker and Windows might restart. Then you should be able to select HDMI Audio out in the Task Bar under the Speaker icon (refereed to as ‘Select Playback Devices’).

I quickly learned that removing the HDMI while powering down the PC and re-powered it without HDMI being attached HDMI Audio would stop HDMI audio from working. I could no longer select the playback device under Select Playback Devices.

Getting HDMI Audio to work after this required that I downgraded the driver and upgrading the driver once again.

Such a hassle! But at-least I avoid the noisy fan in my speakers :-)

Azure Data Studio

August 27, 2019 - Søren Alsbjerg Hørup

I have always used SQL Server Management Studio (SSMS) when interfacing with an MS SQL server or Azure SQL Server. Recently, I have began using Azure Data Studio, an open source alternative from Microsoft (although with limitations).

I have not used it for long, but my experience can be summed up to the following bullets:

  • Round Trip and queries towards the server do not block the UI like in SSMS, but is instead handled in the background as it should be.
  • Even though background processing works without blocking, the UI seldomly show this fact meaning that background completed processing might show up after a couple of seconds without warning.
  • Intellisense is in their for general SQL, but it is not as context aware like in SSMS, e.g. it does not automatically suggest table names unless specified with the full schema.
  • It does not provide much help in the form of designing tables, everything needs to be done by SQL.
  • It provides extensions, similar to VSCode, that can be installed to increase functionality, e.g. connecting to other databases such as Postgres.
  • It has built in support for data charting (although I was unable to get this feature to work)

Azure Data Studio is very nice if you know SQL and frequently use SQL. If however database management / table / schema design is something you seldomly due, and thus require a bit more help in the process, SSMS is in my opinion more attractive due to it provides much more functionality that helps with designing tables and such.

In any case, I think Azure Data Studio will replace SSMS in the future for the majority of users - I will definitely use it for simpler queries that I know by hand.

Attaining flow is hard in today's world

August 21, 2019 - Søren Alsbjerg Hørup

I have recently started reading the book: Deep Work by Cal Newport, about deep work, why it matters and how to achieve a state of concentration where deep work can flouris.

According to Cal, deep work is necessary to achieve great results, but what we typically focus on is the shallow aspects of work - like answering to emails.

I totally agree with Cal’s statement about the importance of deep work, and while I am reading this book (only 1/3 finished) it occured to me that flow is what is attained when going ‘deep’ with somehing.

As a developer, I know the benefits of reaching a state of flow and keeping this state for as long as possible. In today’s world however, it is extremely hard to reach but even more so keep a state of flow.

Primary reasons I have identified that needs to be solved are:

  • The email inbox gets bombarded with requests, questions, etc. and people expect a quick answer.
    • Whenever people do not give an answer, they try the phone.
    • Whenever the phone keeps ringing, they come physically to the workplace.
  • Multiple projects running in parallel fragments focus
    • having one project provides the ability to focus 100% at the tasks necessary to finish the project.
    • having multiple projects splits this focus, requiring effort not to change focus while working on a single project.
  • The lack of priority introduces a state of ‘unease’ which makes it even more hard to achieve flow
    • A project having high priority one day, but low priority the next day, makes it very unfulfilling to go ‘deep’ since one does not know when the priority changes.
    • Worse still, after having experience suchs fluctuations in priority between many projects, one expects that the next project get low priority at a later point - thus eliminating the motivation to go deep and thus attain flow.

Solving the three problems I described above will certainly have a positive effect on attaining a state of flow through deep work.

My current strategy in these matters is to stop getting notifications for email, which disrupts my current state of flow.

Sadly, this strategy only partially solves the first bullet point - more ‘deep work’ is needed to uncover solutions for all bullets.

Dioxins emissions in firewood stoves can be extreme

August 19, 2019 - Søren Alsbjerg Hørup

Studies have shown that Dioxin emissions from firewood stoves can be extremely high, a pollutant which is toxic and cannot be broken down.

Using wet wood or ‘garbage wood’ has shown to increase emission of Dioxins, hence a reduction of wet wood and / or garbage wood should reduce the emission levels.

Using older stoves has also been linked to increased Dioxin emissions, due to older stoves not burning the wood as efficiently and cleanly as newer stoves.

Several other factors influences the Dioxin emissions, such as:

  • Stove type and quality
  • Kindling method, i.e. how the fire was started
  • Chimney quality and environment: wet vs dry
  • Wood type.

Azure Blob Storage Benchmark

July 25, 2019 - Søren Alsbjerg Hørup

Another quick benchmark I did regarding azure was the transfer of 65K messages to an Azure Blob Storage.

My test application was a .NET Core Console application that:

  • Created 1000 tasks.
  • Each tasks would instantiate a message with a unique GUID and populate the message with a payload of 65K.
  • Each task would then push the message to the Blob Storage.
  • This process would be repeated 1000 times.

In total, 1000 x 1000 Blobs were created, transmitted and stored during the run of the application.

The results were that my app was consuming 28% of my CPU and using 600Mbit/s worth of bandwidth - which is the limit of my upload.

Clearly, Azure is not the limiting factor here, neither is my CPU.

Mosquitto Performance on low-end VM

July 24, 2019 - Søren Alsbjerg Hørup

I am currently designing a new topology for inter-controller communication using Mosquitto as broker. For fun, I wanted to see how much I could push Mosquitto so I started a low-end Ubuntu VM in Azure and wrote a simple .NET Test application using MQTTnet to put a bit of a load onto it.

I choose the B1s VM (1 vcpu and 1 GiB of memory), installed Ubuntu, installed Mosquitto and opened the default 1883 port for MQTT. This would serve as my broker.

For the benchmarking application I wrote a .NET Core Console app that would:

  • Instantiate N Tasks
  • Each Task instantiates its own MQTT Net client and Connect to the broker.
  • Each Task subscribes to to a “ping/{clientid}” topic and each second send a ping message containing Environment.TickCount + a 65K payload to the ping topic with its own client id.
  • The ping would be returned back to the Task due to the subscribe and ping-time could be measured.

With N = 200, 200/msg/s would be transmitted to the broker and back again, resulting in a theoretical bandwidth requirement of 13MB/s + overhead.

For the benchmark I decided to run the client on my own dev machine, since I can currently upload 50MB/s using the fiber connection that I have available - plenty of bandwidth for my test purposes.

Starting the client app with N=200, I saw the ping times fluctuating from 60ms to 300ms, indicating a bottleneck somewhere (needs to be analyzed further before concluding anything)

Using Azure Metrics, I could quickly mesure the CPU and bandwidth usage of the VM. The CPU usage of the VM peaked at 28.74% and the upload from the VM to my Client peaked at 15.61 MB/s or 125 Mbit/s.

I did not expect this kind of bandwidth / performance from this class of VM in Azure. I of course only tested the burst performance and not the long running performance of the VM, which might differ due to the VM class being a ‘burstable VM’.

Conclusion after this test: if you want a MQTT broker, start with a small burstable VM and see how it performs over time and then upgrade.

Mailing mortgage bond prices using Azure Functions, PuppeteerSharp MSSQL, and SendGrid

July 05, 2019 - Søren Alsbjerg Hørup

The mortgage interest rate in Denmark is approaching all-time low this summer. The current 30 year bond has a interest of 1% and it seems the interest rate will stay the same or decline even more this year.

I myself have a 3% mortgage loan on my house, therefore it makes perfect sense to convert from my 3% loan to the 1% load currently being offered. Bond prices, and thus the interest rate, goes up and down each day - therefore it makes perfect sense to follow the prices and take the loan when the interest rate is at its lowest.

To follow the bond price, and thus interest rate, I implemented an Azure Function which uses PuppeteerSharp, an high-level C# API to control Chromium over the DevTools protocol, to connect to my mortgage provider to fetch and email the daily price of my target mortgage using SendGrid.

Azure Functions’ do not allow GDI applications to run, due to the restricted sandbox nature, and will therefore not allow Chromium to run. Therefore, I have Chromium running on a seperate low-powered Windows VM in the cloud which my Azure Function connects to using PuppeteerSharp.

After connecting, the Azure Functions spawns a new page on the remote Chromium, redirects the page to the mortgage provider and uses jQuery to fetch the price of the bond. This price is saved in an SQL database, such that a comparison can be made to determine if the price has changed and by how much.

When a price change is detected, the new price + change is emailed to me using SendGrid, an easy to use Email Service. This allows me to easily monitor the bond price each day, since I am actively checking my email all day, without having to visit the mortgage provider.

Getting an email with the necessary information really helps monitoring the trend of the bond and when to act, since it automatically is pushed to me (my mailbox) and all unnecessary clutter is removed, such as the prices of the other bonds.

My next step is to find some other domain where I can apply these principles, or perhaps feature creep and make graph and/or prediction support to my bond monitor :-)

SignalR

May 28, 2019 - Søren Alsbjerg Hørup

I am a frequent WebSocket user. WebSocket is perhaps the single-best thing that has happened to web development since the introduction of HTML5, due to its bi-directional and ‘real-time’ characteristics.

I have frequently used a websocket conncetion to keep the client up to date with regards to changes from the server, especially when doing game related development.

Recently, I stumbled upon SignalR which is more or less an RPC library for .NET and JavaScript. It provides the ability for a JavaScript application running in the browser to invoke functions directly on the .NET server application, and vice versa.

The transport channel is simply a websocket connection, thus anywhere websockets are supported SignalR should in theory be supported. In addition, SignalR is 100% open - allowing anyone the possibility to implement a SignalR client or server for any other language.

I have yet to tryout the library myself - but it is definitely on my to do list!

Android VPN to Windows Server 2012

May 21, 2019 - Søren Alsbjerg Hørup

I recently acquired an Android tablet intended to be used for work related purposes. The tablet is connected to the Internet, but not the company wide Intranet, making it a bit hard to synchronize documents, etc.

A Company VPN is provided, running ontop Windows 2012. This VPN allowing Intranet access when connected. Only two protocols are supported by the setup: IKEv2 PEAP and SSTP.

Internet Key Exchange version 2.0 (IKEv2) is a protocol used to setup a secure connection between two entities using the Internet Protocol Security (IPSec) protocol suite. IPSec is on the Network layer, alongside IPv4 and IPv6.

Secure Socket Tunneling Protocol (SSTP) is also a protocol used to setup a secure connection between two entities. This protocol is an application level protocol, building ontop of SSL/TLS. Since the protocol builds on-top of TCP, it is more prone to performance problems due to the throttling nature of TCP, which is not the case with IPSec since the tunnel is maintained using Network level datagrams. SSTP is however a very ‘friendly’ protocol in the sense that it can punch through nearly all firewalls, due to it using a single TCP port: 443 which also the case for normal HTTPS.

While IKEv2 is natively supported by Android (at least on my Galaxy tablet), SSTP is not. Getting IKEv2 to work against the company VPN server has however shown to be near to impossible due to certificate issues with the current setup. What I can tell, the setup at the company uses self-signed certificates that do not 100% comply with IKEv2.

I tried SwanVPN, an app which implements IKEv2. Here I actually got through some of the certificate issues, by fiddling with the connection settings and adding the self signed certificate and self signed root certificate to my trusted certificates on Android. But, VPN could not be established due an error code of NO IDENTITY was thrown back in my face - this I never solved. The error is apparently related to a missing attribute in the certificate: Subject Alternative Names which I am to this day still a bit puzzled about…

Then I looked into using SSTP, which is also supported by our company VPN server. However, SSTP is not natively supported by Android nor by SwanVPN. Googling around, I found VPN Client Pro: https://play.google.com/store/apps/details?id=it.colucciweb.vpnclientpro

After installing this on my Android tablet, the configuration of the VPN was straight forward and more or less equivalent to setting up the VPN on Windows 10.

Best of all, this worked like a charm!!!

Dapper for .NET

May 06, 2019 - Søren Alsbjerg Hørup

When dealing with databases access in my C# applications I typically use Entity Framework’s code first approach to generate the model. Entity Framework is very nice, but it has two drawbacks:

  1. Generally, it is slow compared to raw SQL - primary reason i believe is that Entity Framework is not able to generate very efficient SQL behind the scene.
  2. Many-To-Many relationships are hard to represent in Entity Framework. Join tables are needed to be explicitly represented using a Join entity.

While researching a project I found another library: Dapper.

Dapper is an light-weight Object-Relational Mapping (ORM) library for .NET. While Entity Framework is primarily used as code-first, Dapper only supports Database first.

To use Dapper, a plain model class is written for each table (very similar to Entity framework) . The class for a User table with an autoincrement Id, Email and a Name would look like this:

class User
{
   public int Id { get; set; }
   public string Email { get; set; }
   public string Name { get; set; }
}

Assuming we have an instance of SqlConnection to an SQL DBMS such as MSSQL or MySQL, we can use dapper to fetch our user rows and transform the rows into a collection of User instances like so:

var sql = "select \* from [User]";
var users = connection.Query<User>(sql);

the users variable is an IEnumerable type, which can be iterated using Linq.
Note: the SQL is tightly coupled to the underlying DBMS - meaning that the same SQL cannot be used to connect to different DBMS’.

Dapper also supports the concept of ‘multi-mapping’ which provides the ability to map a single row to multiple objects. This is especially useful when dealing with joins between two or more tables. Consider the following example which joins the Post table with the User and return a Post instance where the User property has been set to the particular user:

var sql = @"select \* from [Post]
            left join [User] on [Post].UserId = [User].Id";

var postsWithUsers = connection.Query<Post, User, Post>(sql, (post, user) =>
{
  post.User = user;
  return post; 
});

postsWithUsers is an IEnumerable returned by the query. Each Post instance will have a User property pointing to the User instance found during the join.

Dapper makes this work by automatically splitting the joined row on the Id columns. This can be changed through configuration if needed by providing a value on the splitOn parameter of the Query method.

Dapper is very fast, primarily due to raw SQL is being used. Many to many relations can also be expressed using Dapper’s multi-mapper, however, the same drawback naturally exists regarding the join table - but this problem is “pushed” to the database since it does not have to be represented as a model in the code.

If you know SQL and have no problems with being tighter coupled with the underlying database, I highly recommend Dapper.

TypeScript Readonly and Pick

April 28, 2019 - Søren Alsbjerg Hørup

An awesome feature of TypeScript is the ability to generate inferred types. C# supports this feature only for anonymous types, e.g.:

 var t = new { A = 1, B = "b" };

Creates a new object with an anonymous type having two members: A and B.

Similar can be done in TypeScript:

let t = {a:1, b:"b"};

Where t is also an anonymous type having two members: a and b.

TypeScript provides many advanced typing features that can be used to increase type safety.

An example are built-in generics such as Readonly and Pick.

Readonly is pretty simple, it takes a type and returns a new type where all properties are read only. Example:

let t = {a:1, b:"b"};
t.a = 2; // OK.

function makeReadonly<T>(t:T):Readonly<T>
{
   return t;
}

let tt = makeReadonly(t);
tt.a = 2; // not OK

The makeReadonly function simply takes a value of type T and returns the same value but changing its type to Readonly. This throws and error at compile time, thus stopping us from mutation the properties of the object.

Another great built-in generic is Pick. Pick allows us to construct a new type based upon the properties of another type.

Consider the following unsafe example, where we have a pick function that takes an object and returns a new object with only a single property taken from the original object.

let t = {a:1, b:"b"};
function pick<T>(t:T, property:string)
{
   let o = {} as any;
   o\[property\] = t\[property\];
   return o;
}
let o = pick(t, 'c'); // compiles, but c is undefined

Compiles but will fail at run-time since ‘c’ is not defined. This can be made much more type secure by introducing another generic K, which is a set of the keys of the object:

let t = {a:1, b:"b"};
function pick<T, K extends keyof T>(t:T, property:K)
{
   let o = {} as T;
   o\[property\] = t\[property\];
   return o;
}
let o = pick(t, 'c'); // no longer compiles!

Since c is not defined in T, the compiler throws an error. However, type safety is still not guarantee 100%. Consider this example:

let o = pick(t, 'a'); // compiles as expected.
let b = o.b;          // compiles, but b is not defined!

Since we picked ‘a’ from T, the compiler is OK on line 1. The compiler is also OK at line 2, since ‘b’ is defined in type T. However, this will fail at run-time due to ‘b’ not being defined. This can be fixed by using Pick!

let t = {a:1, b:"b"};
function pick<T, K extends keyof T>(t:T, property:K):Pick<T, K>
{
   let o = {} as Pick<T, K>;
   o\[property\] = t\[property\];
   return o;
}
let o = pick(t, 'a'); // compiles as expected.
let b = o.b;          // no longer compiles!

With the introduction of Pick, the function now returns a new Type containing a subset of type T. In the example above, we picked ‘a’ and thus generated a new type containing only ‘a’. The last nine now throws an error at compile time, since ‘b’ is no longer defined.

Using these built-in generics can in the end safe the day, with the added benefit of providing improved intellisense.

Material-UI for React

April 25, 2019 - Søren Alsbjerg Hørup

I have for a long time been a Bootstrap fanboy, but with the introduction of React into my developer life I have been looking for a good UI library that fits my needs.

Typically, I simply used Bootstrap and decorated my components with CSS from Bootstrap - but then I stumbled upon Material-UI a React component library that implements Google’s material design.

Available on NPM here: https://www.npmjs.com/package/@material-ui/core

One simply needs to install a single package which includes typescript definitions also:

npm install @material-ui/core

and if one wish to use the Roboto font, add a reference to it in the TSX or HTML:

<link rel="stylesheet" href="https://fonts.googleapis.com/css?family=Roboto:300,400,500" />

With the package installed, we can use materialized components out of the box, by import, e.g.:

import {Button} from '@material-ui/core/Button';
import {Card} from '@material-ui/core/Card';
import {Dialog} from '@material-ui/core/Dialog';

https://material-ui.com/ has a lot of examples on how to use the different components.

With it’s 1 million weekly downloads, you can’t go wrong with this component library!

Apache Thrift - not a replacement for Protobuf *yet*

April 23, 2019 - Søren Alsbjerg Hørup

I frequently need to share typed structures between applications, such as between an ASP.NET C# Backend and an Typescript React single page application.

For this, I have used Google’s protobuf, a binary serialization library.

In protobuf, one defines the intended information in .proto files and uses a Protobuf compiler to auto generate language specific source files.

syntax = “proto3”; message Position { float x = 1; float y = 2; }

Here I define a message called Position, containing two simples float values: x and y. 1 and 2 denotes the order of which the fields appear during the serialization process - for backward compatibility reasons changing the name is allowed but changing the numbers are not since this will change the order on the wire!

Using a Protobuf compiler, such as protoc, language specific versions of the messages can be generated to fit the required language. For C#, the message above results in a class called Position with public Properties called X and Y, including several serialization methods and Properties such as WriteTo, MergeFrom and Parser.

For the web, protobufjs exists, which is a protobuf compiler implemented in JavaScript. This compiler can generate JavaScript and TypeScript source files to be consumed both in node.js and in the browser. I typically generate files for node.js and use a bundler such as parcel-bundler or webpack to bundle for the browser.

This provides binary transport of my messages from backend to frontend, with type security - very nice indeed.

Lately, I have looked into Apache Thrift, which is very similar to Protobuf but with support for many more programming languages out of the box, and with the added bonus of also supporting Remote Procedure Calls (RPC) . (although RPC can be achieved in Protobuf using gRPC)

The syntax of Thrift messages are very similar to Protobuf, the same message above would be written as:

struct Position { 1: double x, 2: double y }

Note: floats are not supported by Thrift, only doubles.

Looking at the supported languages, it seems to dwarf that of protoc (the default compiler of Protobuf) - with support for nearly 30 languages of the the box. Very nice indeed.

C# and TypeScript is also supported, making the Thrift a prime candidate for my typical needs. However, diving a bit deeper into what support means, it quickly shows that not all languages are equally supported, this includes TypeScript.

Generating browser compatible TypeScript that supports binary serialization is not supported. Node.js compatible TypeScript can be generated that supports binary serialization, but this generated code cannot be consumed by bundlers such as WebPack or Parcel Bundler. RPC is also not supported in the browser, although not required for the project in which I decided to test out Thrift.

Looking through NPM, I found “browser-thrift” - a patched version of node thrift that can be consumed by bundlers, only requiring that require(‘thrift’) is replaced with require(‘browser-thrift’) in generated thrift code.

After a few tries, I never got this approach to work and reverted back to using Protobuf.

Summary: Binary serialization is not natively supported by Thrift in the browser - making Protobuf the obvious choice until this is implemented in Thrift.

Weight Loss using Fasting

April 20, 2019 - Søren Alsbjerg Hørup

I have steadily been losing weight since Summer 2014, where I weighed roughly 107 kg.

Yesterday, I hit another milestone: 85 kg on the scale. (85.8 kg to be exact, but who cares about decimals right?).

My weight in 2017 and 2018 was hovering, on average, around 95 kg and I was not progressing down on the scale.

In late October 2018, with the scale still showing 95 kg, I decided to try something new: Intermittent fasting.

Specifically, I skipped breakfast and lunch once a week.

Mondays were designated as the fasting day. where I only consumed water and coffee until about 16:00.

The effects were immediate! I quickly lost a few kilograms of weight, with early December showing 93 kg - loss of 2 kg.

With Christmas and new years eve out of the way, 1. January 2019 the scale showed a weight of 94.7 kg.

I decided for a simple weight loss scheme based upon intermittent fasting:

  1. I would track my weight every day, using google sheets
    • Easy: this I already do.
  2. I would set a weekly target of 500 g weight loss.
    • Hard: with an average of 60 g / week the last four years, I believed this was very optimistic.
  3. I would cut down on cardio, and do weight lifting instead.
    • 2/3 weight lifting, 1/3 cardio (exercise bike)
  4. I would skip breakfast and lunch every time my daily target was not met
    • Easy: tracking my daily weight + my target weight every day made this a breeze.

Using the scheme above I lost 6.8 kg of weight in three months translating to 566 g / week!

In addition - due to the weight lifting I gained muscle! I plan to follow the same scheme until hitting 80 kg of body weight.

All in all:

greatsucces

Azure 502.5 error with ASP.NET Core 2.1

August 23, 2018 - Søren Alsbjerg Hørup

I recently updated the .NET Core version of one of my ASP.NET Core project from 2.0 to 2.1. To my surprise, the application failed to start after publishing to Azure with a 502.5 error thrown at my face.

Investigation showed that the target version of .NET Core i was using was not avaliable on the App Service instance I was targeting.

To fix this, I changed my Publish configuration from Framework-dependent to Self-contained.

2018-08-23_08-55-53.png

This change will deploy the complete framework alongside my application with the downside that:

  • Deployment takes a bit longer due to the framework needs to be deployed.
  • I need to manage the framework alongside my app, e.g. update it if security bugs or similar are found in the framework.

In any case, this allows me to deploy 2.1 applications to Azure until 2.1 is properly deployed as part of the infrastructure.

Storing JWT access token in a Cookie

July 10, 2018 - Søren Alsbjerg Hørup

I am using JWT access tokens for my latest ASP.NET Core project. Authentication is added in ConfigureServices:

services.AddAuthentication(JwtBearerDefaults.AuthenticationScheme).AddJwtBearer(options =>
{
 options.TokenValidationParameters = new TokenValidationParameters()
 {
  ValidateIssuer = true,
  ValidateAudience = true,
  ValidateLifetime = true,
  ValidateIssuerSigningKey = true,
  ValidIssuer = Configuration\["Jwt:Issuer"\],
  ValidAudience = Configuration\["Jwt:Issuer"\],
  IssuerSigningKey = new SymmetricSecurityKey(Encoding.UTF8.GetBytes(Configuration\["Jwt:Key"\]))
 };
});

This works well for my SPA application, where I store the access token in localStorage (which is bad).  Moving the JWT access token to a cookie is a better approach, however I want the ability to use JWT Bearer for my APIs. Configuration of Dual authentication where:

  1. JWT token can be passed as part of Authorization header
  2. And JWT token can be passed as a token.

has proven cumbersome to implement.

A simple approach is to 1. add an access token cookie when forming the token and to 2. fake the Authorization header on the server if an access token is received as a cookie.

In the TokenController, the Cookie is either set or deleted depending on the success of the authorization:

[HttpPost]
public IActionResult Post(\[FromBody\]UserBody user)
{
 IActionResult response = Unauthorized();
 if (this.Authenticate(user))
 {
  var token = this.BuildToken(user);
  response = Ok(new { token = token });
  Response.Cookies.Append("access\_token", token);
 }
 else
 {
  Response.Cookies.Delete("access\_token");
 }

 return response;
}

When a client sends his credentials, the credentials are checked and if successful a token is returned as part of the response. In addition, the token is added to an access_token cookie (which should be httpOnly for security reasons).

To make use of the cookie, we simply forge the Authorization header based upon the value of the cookie. This is done by writing a simple middleware before the app.UseAuthentication() in Startup.Configure.

app.Use(async (context, next)=>
{
 var token = context.Request.Cookies\["access\_token"\];
 if (token != null)
 context.Request.Headers\["Authorization"\] = "Bearer " + token.ToString();
 await next();
});

app.UseAuthentication();

If the cookie exists, it is added to the Authorization header, thus invoking the JWT Bearer authorization mechanism in the pipeline. If the authorization fails in the pipeline, the Cookie is cleared.

Simple as that!

Parcel-Bundler

May 01, 2018 - Søren Alsbjerg Hørup

Parcel-bundler is a zero configuration web application bundler similar to webpack. It sports multicore compilation and filesystem cache for faster build times, with out of the box support for the most common file types.

Setting up a project using Parcel-Bundler for TypeScript + React is a piece of cake.

Simply create an index.html file which references the index.tsx file directly and invoking the following command from cmd:

parcel index.html

and we are off!

Build wise, parcel will automatically use index.html as entry-point, invoke the TSC compiler for the TypeScript source and include referenced CSS files in the build.

In addition, it will automatically host the bundle on port 1234 and do hot replacement upon changes to the underlying source.

Build wise, it is about twice as fast compared to webpack on my Quad core while sporting even faster build times during incremental builds.

Parcel-Bundler will definitely replace my use of Webpack on most of my projects.

VSync and Browsers (lack-of)

March 21, 2018 - Søren Alsbjerg Hørup

While developing my HTML5 game, LaserDefence, I stumbled upon vsync issues in Chrome - specifically that my game stuttered several times throughout the gameplay.

I tracked the issue down to the specific Chrome version installed as standard webview on Android 6.0 and I was able to fix the issue by compiling my HTML5 game using Crosswalk.

However, investigation of the issue showed that all browsers (more or less) have vsync issues. This has also been reported by vsynctester.com, a site where one can test a browsers vsync capabilities.

For Chrome on Windows, vsync more or less works - i.e. no dropped frames, however on my Android phone a Galaxy S5 running 6.0 vsynctester.com frequently showed dropped frames using Chrome. Other browsers exhibited similar issues.

According to vsynctester.com, both Firefox and Chrome implement vsync “wrongly” meaning that dropped frames will happen resulting in stuttering in the gameplay and or animations.

One is met with the following messages when visiting vsynctester.com from Firefox and Chrome:

“Firefox is hopelessly broken (timers/vsync/etc) — DO NOT USE!” “Google Chrome has VSYNC issues — You can help get Chrome fixed!”

Funny enough, Edge seem to be the browser which implements vsync properly, but even so, Edge does not support high refresh-rate displays which clearly puts the browser at a disadvantage compared to Chrome and Firefox.

As of 2018, no browser seem to implement proper vsync with high-refresh rate support. VERY disappointing considering that more applications are moved to the web, which includes graphical demanding applications.

Lets hope 2018 is the year where atleast Chrome and Firefox mets the quality test of vsynctester.com…

Laser Defence

February 23, 2018 - Søren Alsbjerg Hørup

I implemented my first ever (finished) HTML5 game called Laser Defence.

I used PIXI.JS v4 and TypeScript for the implementation. Visual Studio Code was used as the IDE.

For fun, I wrapped the project into Cordova and published it to the Google Play Store:

https://play.google.com/store/apps/details?id=dk.hrup.laserdefence

I had some issues with consistent frame-rates using Cordova on my Galaxy S5 phone. The fix was to use the Crosswalk Cordova plugin. This plugin comes with its own Chromium instance, which is far superior to the default webview provided by Android 6.0.

The con is a fatter APK, about 20MB - but the pro is a much more consistent experience.

Screenshot of laser defence!

Nativefier

February 15, 2018 - Søren Alsbjerg Hørup

I stumbled upon a cool tool named Nativefier which converts a website into a desktop application, i.e. wrapping it in an executable. Can be installed from NPM and invoked like so:

npm install nativefier -g nativefier somewebsite.com

This downloads all resources from the URL and wraps these in an Electron application which can be distributed.

The resulting application is however a bit fat, easily consuming 90MB of storage. This is primarily due to Chromium and NodeJS being a part of Electron.

Over- and under-clocking Refresh Rate

January 25, 2018 - Søren Alsbjerg Hørup

Recently I have been working on a HTML5 game using Pixi.js. One issue I have come across when doing web game programming is that it is not possible to disable vsync to test my game with higher and lower FPS.

The window.requestAnimationFrame() fires before the next repaint and is therefore tied to the refresh-rate of the monitor in use. For a 60hz monitor, the function fires every 16.66ms.

One could create a custom interval timer to simulate different refresh rates. This works fairly well, although the update will for obvious reasons be out of sync with the monitor.

Another method is to change the refresh-rate of the monitor using INI patching on Windows or using GPU tools such as NVIDIA Control Panel. A monitor is designed for a specific refresh-rate, where 60hz is the most widely PC monitor refresh rate.

Depending on the monitor, it is sometimes possible to over-clock the monitor yielding higher refresh rate. Similarly, under-clocking can be use to reduce the refresh-rate. For my 60hz DELL 2515h monitor I can increase the refresh-rate to 80hz before the monitor goes blank.

This allows me to test different frame rates, while preserving vsync, when developing HTML5 games. Similarly, I can reduce the frame-rate by under-clocking the monitor to e.g. 50hz or 30hz.

For NVIDIA GPUs, changing refresh-rates can easily be done through the NVIDIA Control Panel:

refreshrate.png

The Test button will test the refresh rate before adding it to the list. When added, you can select the custom refresh rates from the drop-down menu to the right.

This can be done even when the game is loaded in the browser. A site such as https://www.vsynctester.com/ can be used to verify that the refresh rate of monitor is in effect in the browser.

8bit Painter - a pixel art editor

January 16, 2018 - Søren Alsbjerg Hørup

Making pixel art has never been a hobby of mine until I stumbled upon 8bit Painter for Android. This app is a bitmap editor with very few features and a lot of constraints - however, this also makes it easy to use on a handheld device such as my Galaxy S5 phone.

Features more or less are:

  • Gallery list with all images made in the app.
  • Grid with each cell representing a single pixel.
  • Pan and Zoom
  • Fixed canvas sizes from 16 x 16 to 128 x 128, nothing customization here.
  • Ereaser, Pen, Fill and Picker tools.
  • Colorpicker with presets, brightness and saturation support.
  • Export to e.g. Google drive

Its an awesome app to use when idling with ones phone, e.g. in a meeting without an interesting agenda :-)

Some stuff I made using the app:

pixelart

Weight Loss - exercise is not enough

January 09, 2018 - Søren Alsbjerg Hørup

I have tracked my daily weight and exercise since 2016. The primary motivation: I wanted to loss a bit of body mass and to do so it would be beneficial to track my progress.

The secondary motivation: I want to statistically calculate if my weight loss is primary due to exercising. This was my initial hypothesis since my weight fell dramatically after I began my exercising. Alas I could not keep the fast decline after a few months, and my new hypothesis is that exercise not the primary factor for weight loss in my case.

This also makes perfect sense, since it is very easy to eat too much during the day which is near to impossible to burn in the evening with the one-two hours of spare time. What does the data say?

For each day since 2016 I have an entry of current weight (measured in the morning) + how much exercise I got for the day. Typically, this is how much I rode my training bike in the evening. My initial hypothesis was that more exercise leads to more weight loss, but not necessarily the day after, i.e. training for 60 min one does not result in weight loss the next day but a few days after.

To simplify my data-set I summed all the daily values into weekly values and converted the weight into a weight changes, i.e. the delta between the first measure weight next week minus the weight on the first day of the week. My hypothesis was that there was a negative co-variance between exercise time and weight change, i.e. negative weight change with increasing exercise time.

[caption id=“attachment_1581” align=“alignnone” width=“743”] 2018-01-09_07-39-03 Scatter plot showing the correlation[/caption]

As seen on the scatter plot, there is indeed a correlation between between exercise time (x-axis) and weight change (y-axis) and it is negative. It is far from perfect though, at does not explain that much. CORREL states that exercise time explains only 30% of the weight change, so 70% of the weight change is not explained by the data that I have collected.

Looking at the data it is clear that increasing exercise helps with weight loss. Getting 100-150 min of exercise during a week seems to be a reasonable choice to maximize weight loss. Beyond this the weight loss decreases in magnitude which I cannot explain.

Getting less than 50 min but more than 0 min of exercise every weeks clearly shows a negative weight loss trend, while getting 0 min of exercise shows a smaller weight gain.

Conclusion: it is important to exercise at-least 120 min a week while keeping in mind that exercise is not the primary factor for weight loss (only 30%).

2017 stats

January 03, 2018 - Søren Alsbjerg Hørup

I started this blog 1 year age. The motivation was 100% for fun and to see how many visitors and view I could get without any niche. I made roughly 64 posts (nice round number) spanning different topics, primarily programming related.

The stats of 2017 are shown here:

2017stats.png

According to the stats I got about 500 views (41/month) and 250 visitors (20/month). Not anything to brag about and nowhere near the 100,000 views / month required to earn a decent amount of money on ads.

To increase the number of views, it is clearly required that one

  • Clearly defines a niche! not just any-topic as I have done.
  • Exposes the content through social media or other sites.
  • Improves the look and feel.
  • Self-hosts - using .wordpress.com looks a bit cheap.
  • Learn to write better.

Although I believe I have improved on the last point - I am nowhere near a blogging expert.

I really need to level up my game if I want to increase the number of views.

So for 2018, my goal is to see if I can reach 1000 views and 500 visitors.

MinResponseDataRate

December 13, 2017 - Søren Alsbjerg Hørup

I recently encountered a problem with one of my many Azure services. The service in question provides an API to download files from a Azure file share; this worked perfectly on some endpoints but not on others.

It took me a while to nail the issue which was due to a violation of MinResponseData rate limit in Kestrel. On endpoints with a stable Internet connection, everything was OK, but on others were the Internet connection was less stable the download frequently failed.

Even if the endpoint had OK bandwidth, the download would still fail since the connection might be gone for a few seconds. According to the docs:

MinResponseDataRate: Defaults to 240 bytes/second with a 5 second grace period.

This can be disabled by

.UseKestrel(options => options.Limits.MinResponseDataRate = null)

Lakka 50hz vs 60hz

December 05, 2017 - Søren Alsbjerg Hørup

Lakka supports Raspberry Pi 3 and I wanted to see if it was indeed powerfull enough to run SNES and N64 emulation.

I flashed a Microsd with the latest Lakka image and tested the setup using my 42” Panasonic Plasma. First impressions were very bad, Super Mario World was choppy and the sound was glitchy.

Changing resolution of retro-arch from 1920x1080 to 1280x720 helped a bit, but still the performance was not acceptable. I tried with vsync off and on, but the performance still seemed bad.

After tweaking a bit, I noticed that the FPS was locked at 50 when inside the menu. It seemed my TV was running 50Hz and not 60Hz. The Super Mario World rom was the NTSC version, i.e. 59.99Hz version, which ofcourse meant that 50Hz would feel bad.

I connected with SSH and using tvservice to see what my output was. Indeed, 1920x1080x50hz was my output!! What the hell…

Luckily, this can be changed within the config.txt file residing in /flash. (Remember to remount flash with write permissions since it is readonly by default)

Adding the following lines to config.txt fixed my issue:

hdmi_drive=2 hdmi_group=1 hdmi_mode=16

the lines above configures the output to be HDMI with audio with a specific mode. Mode defines the resolution and refresh-rate, e.g. mode 16 is 1920x1080x60hz while mode 31 is 1920x1080x50hz. Mode 31 was selected by default in my setup apparently.

After a reboot, everything was smooth as silk.

Recharts vs Chart.JS

November 20, 2017 - Søren Alsbjerg Hørup

For my latest project I required about 50 x 250px x 250px charts on one page. Initially, I used Recharts because it looks freaking great and integrates nicely with React.

I quickly realized however that Recharts does not scale well because it is DOM heavy. For my applicaiton I quickly reached 12,000 DOM nodes. Loading performance is pretty bad when so many DOM elements needs to be initialized - however, the performance when initialized is actually OK.

In any case, I replaced Recharts with Chart.JS and saw a big performance improvement. My DOM nodes were reduced from 12,000 nodes to about 2000 nodes. Loading time was substantially improved and the performance of the application feels much better.

The biggest difference between the two charting components isthat Recharts is implemented using SVG elements while Chart.JS is implemented using a 2D canvas. The canvas only requires a single DOM node, while SVG requires several DOM nodes for data, chart configuration, etc.

In any case, for chart heavy applications with many charts, Chart.JS is my charting component of choice.

glMatrix

October 26, 2017 - Søren Alsbjerg Hørup

I was looking for a fast JavaScript vector library and found glMatrix. glMatrix is a Matrix and Vector library with high performance. The high performance is achieved using API conventions, e.g. by avoiding reducing use of implicit memory allocation and by carefully designing the usage of the library.

The lib does not feel natural but I do like that I know that memory management performance will not explode in my face when using it.

Creating a 2D vector is done explicitly by writing

let v = vec2.create();

while adding vectors together is done by

vec2.add(out, v1, v2);

operations such as add, sub, etc. do not enfer any memory allocation what so ever, making the operations fast and without garbage collection at a later time.

The API does feel very ‘C’ like. I really miss the ability of .NET where one can allocate to the stack by using Structs.

Tagged: JavaScript

Photoshop Mockup

October 25, 2017 - Søren Alsbjerg Hørup

I ditched the idea of doing mockups using scripting from Photoshop. The primary reason was that Photoshops scripting capabilities are not great for doing WYSIWYG, i.e. every time a code change is made one has to reopen and reload the script. I had personally hoped for the ability to do F5 refresh of the script without any hassle.

Alas this is not possible. In any case, I actually did manage to produce a Mockup of a Red Alert inspired game using both real-time and turn based mechanics. This mockup was made using Photoshop and conventional tools.

mockup_1

I got heavily inspired by the graphics of the Cmd & Kill game made by renderhjs. Primary inspiration thread can be found at: http://polycount.com/discussion/120427/pixel-art/p10

I got the idea of combining RTS and Turned-based strategy. The concept uses two phases: planning & execution. In the planning phase, one plans troop movements, production etc. In the execution phase, troops move and attack. I made a GIF showcasing the concept.

lvl1

I haven’t really decided yet if I want to pursue this any further - but I believe it can be made to work. Frozen Synapse uses something similar, although this is on a more tactical level compared to what I was thinking.

Photoshop Scripting

October 17, 2017 - Søren Alsbjerg Hørup

In Photoshop CS6+ it is possible to do scripting using JavaScript. Photoshop exposes a DOM, similar to that found on the web, where one can manipulate layers, etc.

Creating a new document is as simple as invoking the following code:

var docRef = app.documents.add(2,4);

Next up, we can add a text layer:

var artLayerRef = docRef.artLayers.add(); artLayerRef.kind = LayerKind.TEXT;

and set the text of the text layer:

var textItemRef = artLayerRef.textItem; textItemRef.contents = “Hello world”;

Simple as that.

I had an idea that I might be able to use Photoshop for some mockup purposes using scripting. Not yet verified though.

Android 8.0 Security Changes

September 21, 2017 - Søren Alsbjerg Hørup

One of my Apps recently broke with the introduction of Android 8.0. The reason being Android 8.0 introduced tighter security.

My app required the SEND_SMS permission to obviously send SMSes. This was the only permission required and have worked without any issues on pre 8.0. The reason was that my app also required the READ_PHONE_STATE permission - this was automatically granted when the SEND_SMS permission was granted prior to 8.0.

This is no longer the case on Android 8.0, the app now has to explicitly ask for the permission.

Tagged: android

Reactstrap

September 20, 2017 - Søren Alsbjerg Hørup

Bootstrap is my favorite CSS framework and React is my favorite JavaScript library for frontend development.

Reactstrap combines the two, by more or less implementing all of Bootstraps CSS classes into React components.

Usage is super easy, just import the component one needs into a React project and use it as any React component:

import React from 'react';
import { Alert } from 'reactstrap';
const alert = (props) => { 
  return <Alert color="success">Success!!!</Alert> };

Nothing more to it.

When using TSX instead of JSX, one also gets type support which is super great when dealing with a huge project.

Weight loss - from 107.5kg to 96kg

August 22, 2017 - Søren Alsbjerg Hørup

I made a decision to lose some weight exactly one year ago. This was prompted after a one week vacation with too much to eat and too much to drink and the weight telling me that my mass had increased close to 107.5kg!
107.5kg is waaay to much for my measly 189cm height, with a BMI of around 30 I was considered obese and not just overweight. I made a decisions to 1. eat less and 2. get more exercise. My goal was to reach 95kg in one year time.

One year has passed and I nearly made it there. My weight is now 96kg and my BMI has dropped from 30 to 26.9, which is still overweight but not considered obese.

Great Success.

For motivation and for sciency purposes, I decided to weigh myself every single day and record how much I exercised. Google sheets was perfect for this since I could easily input my weight and exercise minutes from my phone in the morning. Weighing was always done right after I left the bed in the morning.

weight.png

As seen, weight-loss motivation was very high from August until start December. Then Christmas came and the temptations started. But I quickly got back on track with a decent amount of weight loss.

I did not fully reach my 95kg goal, partly because summer vacation resulted in 1 week with eating and drinking, as seen in the end of the graph where my weight spiked.

Regarding exercise, I mostly used my traning bike + a bit of running. On average, I exercised 14min a day according to my data, with a total of 86 hours! Not bad for a beginner!

My total weight loss is 11.5kg close to one kg each month about 30g/day. My next target is 90kg, i.e. 6kg weight loss. With 30g/day I expect to reach this in about half a year / end of january

Stay tuned!

Tagged: Weightloss

VSCode 1.14 and tasks

August 15, 2017 - Søren Alsbjerg Hørup

I recently started a new Electron Typescript project using version 1.14 of VSCode. Getting the task runner up and running using CTRL+B did not initially work, due to the fact that tasks.json is auto-generated as version 2.0.0 compared to version 0.1.0 which was the default in VSCode 1.13.

In addition, the new VSCode supports task auto-detection which confused the hell out of me due to it detecting tsconfig.json and asking me if I wanted to compile some typescript, even though my Tasks.json file was not yet created.

Apparently, MS added task-auto detection to the mainline during my vacation rendering tasks.json as an optionel part of a VSCode project. tasks.json is still required if one wish to create custom tasks or scan and parse the auto-detected tasks shell output.

This feature is great! since now I can make all my tasks in NPM without having to re-define them in tasks.json. VSCode can now detect these tasks automagically.

2017-08-15_08-53-02.png

Although I still have to add the tasks in tasks.json if I want to define the default task addition to allowing VSCode to scan for problems.

Back from Vacation

August 14, 2017 - Søren Alsbjerg Hørup

I just returned from a well-earned 1 week vacation in a sommer cottage in south Denmark. For the trip, we packed the car with enough equipment for a month! Just look at that:

20170805_124048.jpg

The car was 100% full. Two grown ups + a three year old and a three month old baby really require a lot of stuff.

My guess is we used about 25% of the items packed, hence we ‘overpacked’ for vacation - a typical mistake :-)

Windows Hooks as non-admin

July 19, 2017 - Søren Alsbjerg Hørup

My most recent productivity application, Shortcutty, requires the ability to hook into Windows to capture keydown events. The purpose is to show (or hide) the application whenever the user pressed CTRL+~.

I easily got this to work using the Win32 API + PInvoke in my .NET application. But, on some applications such as my Visual Studio instance, the hook failed by unknown reasons.

After a bit of debugging and digging through online archives on the matter, I quickly realized that the issue was as simple as my application not having administrator rights. The latter is required if I want my application to interact with other applications having higher privileges.

Visual Studio, as it happens, was running with admin-rights - thus my application was unable to hook into it, obviously for security reasons. Generally: a non-administrator process cannot interact with a process having administrator rights. You cannot even drag and drop between applications.

PolyK.JS

July 12, 2017 - Søren Alsbjerg Hørup

I needed a polygon library for my latest fun project (a TypeScript Build Engine). Google and NPM showed me the way to PolyK.JS, a very simple Polygon library that can do calculations on simple polygons, including Convex ones.

To my suprise, the library includes TypeScript  definitions making the lib super easy to consume for my application. Supported operations include:

  • GetArea Gets the area of the polygon.
  • Triangulate Triangulates the simple polygon
  • Slice Slices the polygon.
  • Raycast Finds the closest point on the polygon given the intersection of a ray.
  • ClosestEdge Finds the closest edge of the polygon.
  • ContainsPoint Checks if a given point is within the polygon.

The library assumes that the polygon’s vertices are defined in an number[] array of X,Y coordinates. Super easy to use and highly recommended!

.NET Core

June 30, 2017 - Søren Alsbjerg Hørup

.NET Core is yet another .NET framework implementation implementing .NET Standard 1 (production) and .NET Standard 2 (beta) while also extending the standard with .NET core specific API’s such as Console and Thread (which are not part of the .NET Standard).

The cool thing with .NET Core is that it is: 100% open-source, 100% cross-platform and very modular. This stands in contrast to .NET and Mono since these are very monolithic implementations and huge in size. The source is available under MIT on GitHub: https://github.com/dotnet/core

Since .NET Core is very crossplatform, one can write .NET applications for x86/ARM Windows and x86/ARM Linux - and since it is very modular, the framework does not occupy much space compared to the desktop implementations.

API’s are generally not available in the framework but needs to be downloaded from NuGet, e.g. EntityFramework, ASP.NET, and even some Reflection support are an “add-on”.

I measured the raw framework installation on my Win 10 x64 box to about 70MB, while the .NET 4.6 framework is roughly 2000MB in size, that is, 28 times larger! Deployment wise, .NET Core SDK supports deploying application + framework meaning that the target does not have to have the specific framework installed.

The SDK will automatically pull all the dependencies into the publish package, which includes all NuGet dlls + native assemblies where applicable (e.g. if using sqlite .NET core wrapper). One can also publish to a specific target, such as Linux-x86 or Linux-arm, which will produce a platform specific package with an elf executable that can be executed.

Referencing .NET assemblies which does not target .NET Standard or .NET Core is not possible in .NET Core 1.1 since the APIs are incompatible. .NET Core 2.0 will include a compatibility layer making it possible to reference assemblies targeting other frameworks - although this sounds awesome, I have not experimented with this feature yet.

.NET Core is without a doubt the future of .NET!

Wolf3D using THREE.JS

June 26, 2017 - Søren Alsbjerg Hørup

I stumbled upon three.js and Javascript 3D library which abstracts away WebGL. I have always been a fan of OpenGL and WebGL, but I recently just wanted to get some 3D stuff to work in the browser without having to deal with the complexity of the WebGL statemachine - and shaders.

Three.js is just this, an abstraction ontop of WebGL which takes care of the lower level stuff while exposing objects such as Geometry, Texture, Material, Camera etc. Getting a 3D scene up and running with correct perspective is super easy if one has a basic understanding of 3D. Typings are also available for three.js, meaning full Typescript support.

For fun, I implemented a Wolf3D engine using the original textures and sprites using THREE.JS. The entire renderer code is less than 220 lines, and this includes alot of copy pasting and commented out experimentation. My guess is that the code could be leaned to less than 150 lines. Source available at GitHub: https://github.com/horup/wolfts

2017-06-26_07-43-54

.NET Standard

June 23, 2017 - Søren Alsbjerg Hørup

The .NET framework has been branched into several implementations to match the constraints of the target platforms, e.g. Compact Framework for Pocket PC, Mono for Linux and the full .NET Framework for Windows.

This poses a problem regarding library compatibility between them. Writing a library is not straightforward since one has to target the specific framework in which the library is consumed.  This has somewhat been alleviated by Portable Class Libraries (PCLs), since this type of library can target multiple frameworks. It is not a 100% solution, since when a new framework emerges the library in question is not automatically compatible with the new framework.

The solution has been to introduce a versioned formal API specification called .NET Standard. This standard is implemented by all the most common framework implementations. Writing a library targeting .NET Standard 1.0 ensures that the library can be consumed across different frameworks, if they implement the .NET Standard 1.0.

The .NET Framework 4.5 implements .NET standard 1.1 while .NET Framework 4.6 implements .NET Standard 1.4. Writing a library for both .NET Framework 4.5 and 4.6 can easily be done by targeting .NET Standard 1.1. Also, Windows Phone 8.1 and Mono implements .NET Standard 1.3 or above making the said library compatible with these implementations.

Each new version of the .NET Standard inherits from the previous version, making a new version a super-set of the old version. The API specification is written i C#, making it straight forward to read and adapt the API to a new implementation.

.NET Core is the latest framework implementing .NET Standard, more on this later.

Linq To Sql .Attach

June 12, 2017 - Søren Alsbjerg Hørup

Linq to SQL is a very nice abstraction when dealing with MSSQL, specifically the ability to conduct Linq queries in C# against MSSQL is pretty sweet. Updating a row through an ORM object, e.g. a HTTP Put, into the DB without doing manual field copying between the tracked entity and the de-serialized entity from the PUT is however a bit troublesome.

.Attach allows one to attach an entity to a Context, however calling SubmitChanges will not submit the changes of the attached object due to it not being marked as modified. Calling Attach(entity, asModified) with asModified = true did not work for me - an exception was thrown.

Apparently, this overload can only be called with asModified = true IFF Update Check is set to Never in the DBML file. This needs to be done for all properties of the given entity class, not sweet, but at-least it avoids the need to manually copy each member to an existing tracked Entity in the Context.

Jira SDK nuget

June 06, 2017 - Søren Alsbjerg Hørup

Accessing Atlassian Jira from a .NET application can be done very easily by installing the Atlassian Jira SDK.

Install-Package Atlassian.SDK

From the nuget console.

This introduces the Jira assembly with alot of different classes and helper functions. E.g. one can connect to Jira using:

Jira.CreateRestClient(url, username, password)

which instantiates the Jira class which can be used to get Versions, Issues, etc. from Jira. A real treat using this library is that it proved Async methods, i.e. await keyword can be used throughout the usage.

getting all Versions of a specific project/key can be done using:

var results = await jiraConn.Versions.GetVersionsAsync(key)

getting issues using a specific JQL query can be done using:

var results = await jiraConn.Issues.GetIssuesFromJqlAsync(jql)

super easy!

System.AccessViolationException and .NET 4.0

May 29, 2017 - Søren Alsbjerg Hørup

The  System.AccessViolationException is thrown if one tries to marshal unamanaged memory from an invalid location, e.g. using a bad pointer. Prior to .NET 4.0, this exception was catch-able from within the CLR.

With .NET 4.0,  System.AccessViolationException exception is no longer catched within the CLR, meaning that the application now crashes without necessarily logging the information in log4net. The stack trace can however be seen in windows’ event viewer.

It is possible to mark the method in which the exception is thrown using HandleProcessCorruptedStateExceptionsAttribute, thus making the method throw the exception into the CLR and making it catchable.

XenServer Auto-boot

May 20, 2017 - Søren Alsbjerg Hørup

Apparently, auto-booting of a VM on a XenServer was removed in 6.0+.

auto-booting can still be done by utilizing the command line from XenCenter.

First, one must specify the Pool as being “auto-bootable”. Next, one must specify the VM as being “auto-bootable”.

This guide shows the exact steps necessary to achieve both:

https://support.citrix.com/article/CTX133910?\_ga=2.31680062.1085016927.1495305235-736173257.1493920566

XenServer

May 06, 2017 - Søren Alsbjerg Hørup

Creating Virtual Machines (VMs) is a great way to easily deploy software for testing and production purposes. For many of my projects, especially those requiring a HTTP backend, I create a VM to host said solution.

Azure is a great way to host in the cloud, but it can get quite expensive - especially if one needs a lot of VM’s for testing purposes. In addition, transferring stuff to and from the cloud requires a beefy internet connection when dealing with BigData related entities.

Recently I experimented with setting up my own HyperVisor using cheap hardware, specifically: a Intel celeron J1900 quad core with a small 128GB SSD and 8GB of ram, to host some of my VMs.

Installing VMWares VSphere Hypervisor (ESXi) was my initial thought, but I could not get the install process all the way through. Apparently, ESXi only supports a limited number of hardware configurations. Luckily, an OpenSource alternative exists call XenServer.

XenServer is, more or less, a Linux powered hyper-visor. Installing is a breeze, simply get the ISO from XenServer.org, flash an USB with the image and bootup a x64 with the virtualization technology enabled. After a few minutes of installing, XenServer is up and running and can be connected to from another PC using XenCenter management tool.

XenCenter allows one to create VMs, configure NFS, remote control a VM, take snapshots of a VM, and so on. XenCenter also allows one to create Pools of one or more XenServers (clustering=. The latter is especially awesome since it allows one to setup a centralized NFS for the virtuals disks and then deploy the VMs between the available XenServers.

I have not yet created a pool with more than one XenServer, but I want to install three of the above mentioned hardware and designate one as master and the other two as slaves. This would allow me to virtualize across three nodes, with a total of 12 CPU cores, 384 GB fast SSD and 24GB ram.

Stay tuned for the latter when I get more hardware to add to my pool.

Postman

April 28, 2017 - Søren Alsbjerg Hørup

Nearly all my latest projects have some sort of RESTful API. For testing purposes I use Postman, a HTTP client aimed at making it easier to test APIs by allowing custom messages to be formed.

The application can be run as a Chrome app or downloaded for Windows, MacOS and Linux distros as an application (executable).

Testing GET using the browser is straightforward, unless some specific header needs to be constructed. Testing POST, PUT, etc. is typically harder in a browser, since the browsers addressline is tied to GET (for obvious reasons).

Postman allows one to use many (if not all) of the HTTP methods. Postman allows one to specify the body of e.g. a POST. It allows also the ability to specific the exact headers for the request.

Frequently used requests can be saved into a history which is searchable, and one can also make collections of HTTP requests for specific applications.

Regarding the body content, postman supports TEXT, JSON, HTML, XML, etc. Binary is also supported by choosing a file on the disk to send.

Highly recommended for those who build or consume RESTful APIs.

Postman in action, running as a Windows 10 application.

DNS for Azure VM

April 19, 2017 - Søren Alsbjerg Hørup

I needed several VMs in Azure for testing purposes and I required a semi-stable HTTP server on each of them. Normally I give the VM a public IP, but since this was for testing purposes I did not want to waste any of my public IPs.

Azure VMs can still be accessed from the outside even without a public IP, but the IP changes during each reboot (at-least). Azure allows one to setup a DNS address for the dynamic IP to be used instead of the IP, which is awesome.

This can be done by:

  • Selecting the VM’s resource group under Resource Groups in the Azure portal.
  • Select the Public IP address associated with the VM.
  • Select Configuration and then specify the optionally DNS name.

Depending on the location of the VM, the DNS will look something like this:

xyz.westeurope.cloudapp.azure.com

Obviously, one must choose a name which does not conflict with another DNS in the Azure cloud.

HTML5 RDP Client

April 05, 2017 - Søren Alsbjerg Hørup

The Remote Desktop Protocol (RDP) is a protocol used for remote desktop connections primarily against PC’s running Windows, or VMs in the Azure cloud. The protocol is similar to VNC in many ways.

The HTML5 application I am currently building required the ability to seamless connect to a desktop computer using RDP. HTML5 however does not support RDP and cannot easily be implemented in the browser due to:

  • HTTP cannot be used for cross-domain connections.
  • WebSocket is not implemented by the remote PCs that I need to connect to.

The solution I found was to “tunnel” an RDP connection through the server hosting my HTML5 application. Several solutions exists, one being: Myrtille.

Myrtille is basically an ASPX application hosted in IIS, which provide a WebSocket interface and HTML5 remote desktop client (it also support HTML4 using HTTP which is slower). Myrtille, upon getting a connection request from a web client, tunnels the request back and forth through a Gateway service which comes with Myrtille.

The gateway utilizes a free implementation of RDP callsed FreeRDP, specifically wfreerdp.exe on Windows. The gateway service spawns a wfreerdp.exe process which does the actual RDP connection to the remote desktop computer.

When the connection is made, mouse and keyboard input is sent from the HTML5 client in the browser, through Myrtille to wfreerdp. Image data is transmitted from wfreerdp back to the HTML5 client.

[caption id=“attachment_1150” align=“alignnone” width=“1168”] rdp.png The RDP client in action running inside my Chrome browser[/caption]

MariaDB: Access from 0.0.0.0

March 29, 2017 - Søren Alsbjerg Hørup

I recently installed MariaDB, a MySQL fork, on a Linux VM in the cloud for testing and development purposes. I really struggled with getting proper access from my dev machine to the installation in the cloud.

Simply put, I just wanted a totally open SQL database for deving and testing, nothing production wise was needed.

MariaDB is by standard pretty secure: a good thing, and does not allow remote access: also a good thing.

Firstly, one has to edit the proper .cnf file under /etc/mysql/* and set the bind-address from 127.0.0.1 to 0.0.0.0. MariaDB by default listens only on the loopback interface, thus making it impossible to reach it from outside either LAN or WAN.

Next up, one needs to restart the service: service mysql restart which will apply the changed bind-address.

Now it is possible to connect from outside, TCP/IP wise, however, the MariaDB user (such as root) needs to be granted access from outside to be able to actually make a logical connection to the DBMS.

This can be done by issuing the following SQL query (in this case, for root with password xyzw):

GRANT ALL PRIVILEGES ON *.* TO 'root'@'%' IDENTIFIED BY 'xyzw' WITH GRANT OPTION;

Which will grant root access level from anywhere.

To fire off this SQL, I suggest to simply login to the box using SSH and connect to the mysql CLI using:

sudo mysql -u root

and then fire off the query.

Method of loci

March 21, 2017 - Søren Alsbjerg Hørup

I stumbled upon the method of loci in my quest to improve my memory. Although I have an OK ability to recall information, I struggle with names of places and especially things.

The method of loci is an ancient technique invented by the Greeks I believe, where one mentally attach images, sounds, etc to known location, be it real or fictional, in ones memory. This method is also known as the memory palace technique.

The important part is to use locations which are well known for ones loci, for me this could be:

  • Left lamp-stand in my bedroom.
  • The bedroom door.
  • The dashboard of my car.
  • The desk of my work.
  • The first part of the first level of super Mario bros (where you get the mushroom for the first time).

To remember stuff, one breaks the subject into images/words/sounds that can be mentally attached to a loci. For instance, to remember the license plate number of AV28011 of a white van, I would place the following mental images in three locis:

  1. Looking to the left laying in my bed, I see a VHS recorder with an AV out connector laying on my lamp-stand.
  2. From the lamp-stand, I take the VHS through the door, where the number 28 is itched into the white paint.
  3. Grabbing the handle, I notice the number 011 hanging on a waving sign under the handle.

When trying to remember the license plate of the white van, I just need to focus on the first loci: the lamp-stand in my bedroom. I will quickly see the VHS and from there know that I have to take it through the door, thus notice the 28 itched into the white paint, and finally see the number 011 hanging from the door handle.

I just tried this technique the other day, and I was impressed by how easily I remember the license plate of the white van.

If you struggle with memory recall, try this technique.

Node on Raspberry PI

March 15, 2017 - Søren Alsbjerg Hørup

I recently re-installed a PI with NodeJS support and MariaDB support.

NodeJS is not known by apt-get (a strange beta/alpha version is present, version 0.10 or something, not what we want).

I found this guide for the job: http://thisdavej.com/beginners-guide-to-installing-node-js-on-a-raspberry-pi/

More or less, execute the script located at deb.nodesources using:

curl -sL https://deb.nodesource.com/setup\_7.x | sudo -E bash -

and then proceed with apt-get install

sudo apt-get install nodejs

Simply as that!

Tagged: linux node

Chart.js

March 09, 2017 - Søren Alsbjerg Hørup

In the past I have used D3.js and even Highchart.js for my charting needs. Today, I decided to tryout yet another Open Source alternative: Chart.js.

Chart.js is available through npm and @typings also exists for TypeScript fans such as myself:

npm install chart.js —save

npm install @typings/chart.js —save

Chart.js can be included with the script tag, CommonJs, ES6 and RequireJS. Although for HTML5 programming I always do the legacy route using script tag (I know.. I need to move with the tech).

Chart rendering happens in a canvas, nothing fancy DOM manipulation which I really like, especially when working with ReactJS. The chart look and feel is very generic, nothing fancy here.

I really like the tool-tips though:

chartjs.png

Chart.js is also responsive, thus scaling to different screen sizes. I have yet to tryout this feature though. Apart from this, it supports animation, multiple axis, mixed chart types, and more.

8 chart types are provided out of the box. Definitely recommended.

TurboGrafx-16/PCEngine CD Emulation

February 25, 2017 - Søren Alsbjerg Hørup

Lakka supports TurboGrafx/PCEngine emulation out of the box atleast for ROMs, but the CD roms (cue/bin) requires that one find the correct bios: syscard3.bin and uploads this into the system directory on the Lakka box. No issues with this if one can find the correct syscard3.bin file.

However, I still struggled getting PCE CD emulation to work since Retroarch crashed whenever I tried to load Castlevania: Rondo of Blood.

Rondo of Blood for PCEngine/TurboGrafx

It took me some time to figure out what the problem was and no resources online was helpful. I finally pinpointed the issue to the .cue file of the release. Even though the .cue file was 100% correct, i.e. all .wav and .bin files were correctly referenced by the cue file with no apparent pathing issues, I had to change the cue file manually to get it to work:

  1. I removed all spaces from the filenames, e.g. “rondo of blood(j).bin” -> “rondoofblood(j).bin”.
  2. I removed all *special characters*, e.g. “rondoofblood(j).bin” -> “rondoofblood.bin”.
  3. I changed all Tracks to be of BINARY Type, i.e. WAVE -> BINARY.

I believe step 3 was what did the trick for me. Example of an WAVE entry converted to BINARY:

Before:

FILE Track01.wav WAVE TRACK 01 AUDIO INDEX 01 00:00:00

After:

FILE Track01.wav BINARY TRACK 01 AUDIO INDEX 01 00:00:00

Not sure why this works, but it does atleast on the latest Lakka x86 build.

After booting the game, no sound would play of any kind. I wrongly believe this to be due to my hack above, but no, this was simply because the emulator defaults to 0% music, ambient and effects volume, but why?!?!

Increasing the volume to 100% fixed the issue.

BTW - Rondo of Blood for PCE is better than Castlavania X for the SNES even though they share alot of gameplay elements…

Just my two cents.

Browser saveAs

February 24, 2017 - Søren Alsbjerg Hørup

The latest feature request required the ability to export the data contained within an HTML table to a file on the disk. To do this, I looked at the W3C Writer API: https://www.w3.org/TR/file-writer-api/

This API is not yet implemented in all browsers, and I thought that I had to look elsewhere. But then I found this: https://github.com/eligrey/FileSaver.js/ an implementation of the W3C standard usable by modern browsers.

Including FileSaver.js into my document allows me to call saveAs as if my browser natively supported. Saving some text to disk is as simple as making a Blob with the text content, correct mime-type and then calling saveAs:

let blob = new Blob("text", 
{
 type:"text/plain;charset=utf-8"
});
saveAs(blob, "exported\_text.txt");

Using this in TypeScript requires the correct typings for saveAs. I didn’t find them for this project, I simply declared saveAs as any type:

declare var saveAs;

Super easy, and verified to work on my PC using latest Chrome and IE :-)

PixiJS Interactive

February 21, 2017 - Søren Alsbjerg Hørup

Interacting with Pixi v4 objects, such as mouse clicks or taps, can be done by setting the interactive flag to true. The documentation related to Pixi v4’s interaction was a bit scarce - it took me some time to figure this out.

obj.interactive = true;

This instructs the Pixi engine that the object can be interacted with. It is then possible to attach even handlers to the object:

obj.on("mousedown", (e:PIXI.interaction.InteractionEvent) =>
{
});

Similarly, when on a touch-enabled device, one can attach touch events such as touchstart:

obj.on("touchstart", (e:PIXI.interaction.InteractionEvent)=>
{
});

I had some issues regarding PIXI.Graphics where my touch/click events would not be registrered. The issue was due to the hitArea being zero. Apparently, one has to manually set hitArea on a PIXI.Graphics instances:

graphics.hitArea = new PIXI.Rectangle(0, 0, width, height);

PixiJS is really simple to use when it comes to its interactive abilities.

Windows 10 - Virtual Desktop

February 15, 2017 - Søren Alsbjerg Hørup

Microsoft introduced the Virtual Desktop concept with the introduction of Windows 10. This is similar/direct clone of how many Linux distributions support multiple desktops, allowing multiple desktop instances to house separate windows.

Simply put, this feature is awesome when working on multiple projects at once, since one can layout the windows in the order that make sense for one particular project without sacrificing the layout of another project on another desktop.

For work, I typically have a desktop for my Outlook + misc documents while a second desktop houses my Visual Studio + other dev related stuff. I typically have a third desktop for music playback / other media.

This setup is especially powerfull when working on server/client projects at the same time.

One desktop can hold the Server related development, while another desktop can hold the client related development. Switching between desktop is as easy as using WIN + CTRL + left/right arrow keys.

If something comes up, e.g. a support case during work, one can simply create a total new desktop to take care of this using WIN + CTRL + D. This allows one to easily resume work on an existing project when the case has been resolved.

65 x Wheelbarrows

February 14, 2017 - Søren Alsbjerg Hørup

I did some home-renovation in the weekend where I dug out 12 square meters worth of concrete and sand. My aim is to install 30cm insulation in the floor, floor heating and a 10cm concrete slap. Floor heating is worth the digout trouble.

img_20170211_141421

The first thing I struck was that there were a previous floor heating installation, as seen on the photo above with no insulation of any kind. My guess is that the floor heating was installed when the house was built in 69’ and at some later date has been disconnected due to excessive energy requirements.

img_20170212_101802 The total sum I dug-out was close to 5 cubic meters. Using power tools, a showel and 3 x 12 liter buckets… took some time.

Fun fact: I counted 65 wheelbarrows worth of concrete, sand + misc. when I moved it to the container:

img_20170212_170151

I will install 30 cm insulation + floor heating in the coming weekend. Much less demanding than shoveling out and moving 5 cubic meters!

IPX Wrapper

February 05, 2017 - Søren Alsbjerg Hørup

Many of the old DOS / early Win95 games utilizes the IPX protocol for multiplayer.An example of this is the game: Carmageddon and Red Alert 2

Inter Packet Exchange (IPX) has long been deprecated in favor of TCP/IP, meaning that it is somewhat hard to get old games to play on modern PCs - even PCs running Windows XP.

Although Windows XP does support IPX natively, getting games to run using this protocol is hard on modernish hardware - in any case, I have never really succeeded.

Lucky for us, IPX wrapper exists that wraps IPX packets in UDP broadcast packets meaning that the game/application talks IPX but using UDP as a Network layer protocol.

IPXWrapper by Solemn is exactly this, a wrapper for many of the old games: http://www.solemnwarning.net/ipxwrapper/

I recently tested this out using Carmageddon, a racing game from 97’ against a couple of friends in a LAN setup. Just copy over the dlls into the game directory and the game will load these dlls instead of using the ones coming with Windows and will thus use UDP as Network layer packet transport.

Wonderful workaround to deprecation!

Wireless charging mod for Galaxy S5

February 02, 2017 - Søren Alsbjerg Hørup

I bought a cheap wireless charging kit on eBay for my old Samsung Galaxy S5 phone. It took nearly 3 months for it to arrive from china, costed about 8usd - but it works flawlessly.

s-l1600

The kit includes a wireless charging pad, of cheap plastic, and the circuit responsible for charging the phone.

The circuit requires no soldering - it just rests on-top of two terminals on the phone and is hold onto place by the battery. Simple, although it feels a bit flimsy during assembly I have had no issues with the circuit loosing electrical contact with the phone.

PixiJS

January 31, 2017 - Søren Alsbjerg Hørup

Last week I started a prototype gamedev project where players can join a game using the mobile phones but only see the action on a shared screen. Think hot-seat where the controllers are the mobile phones.

I decided that I wanted to write an 2D HTML5 game in the browser using Canvas. But before utilizing my HTML5 Canvas skills I looked at what libraries might be able to help me in the endeavor.

It turns out that there are alot of libraries that can take care of basic sprite and tile rendering. PixiJS is such a library, providing a nice deferred renderer using hierarchical stage abstraction.

What I really fell in love with regarding PixiJS is the fact that it both support WebGL and Canvas rendering. This means that if the browser supports WebGL, it will utilize WebGL or else it will fallback to Canvas - nice, although not sure how this translates in a real world scenario where the Canvas typical is so much slower compared to the hardware accelerated rendering provided by OpenGL.

Rendering stuff with PixiJS is done by setting up some container in which one can put DisplayObjects:

let stage = new PIXI.Container();

Sprites can be created and added to the container:

let launcherTex = PIXI.Texture.fromImage('images/sprites/launcher.png');
let sprite = new PIXI.Sprite(launcherTex);
sprite.x = 123;
sprite.y = 123;
sprite.anchor.x = 0.5;
sprite.anchor.y = 0.5;

stage.addChild(sprite);

When done setting up the stage object, it can be send to the renderer for rendering:

renderer.render(stage);

PIXI.Containers are also DisplayObjects, and can be added to other containers, e.g. this is possible:

let stage1 = new PIXI.Container();
let stage2 = new PIXI.Container();

let final = new PIXI.Container();
final.addChild(stage1);
final.addChild(stage2);

renderer.render(final);

A Sprite is just a Container and can contain other sprites/other Display-objects, making it possible to hierarchical subdivide a scene into smaller and smaller components.

nukey

The GIF shows my prototype in action using PixiJS.

Scorched Earth / Worms inspired but currently with a lack of terrain destruction and pretty graphics :-)

Toggl - Quick Look

January 27, 2017 - Søren Alsbjerg Hørup

Toggl is an online service and app that can help keeping track on what you spent your time on. For my purposes, to keep track of what I work on project-wise, I installed the Windows desktop which is shown in they Windows tray as a on/off icon.

The app supports nagging reminders if I have forgotten to enable tracking, and it supports the notation of Projects and Descriptions. The first means that it is possible to create multiple projects, such as the names of the projects that I am working on in the moment. The latter means that one can describe exactly what is being worked on in a specific project, e.g. “implementing rendering”, “testing rendering”.

The desktop application for Windows

This is a very powerful way of getting a quick overview of how time is spent across a project - if one remembers to track that is. On toggl.com, it is possible to see reports and dashboards of how time is spent each day or week.

It also support clients, i.e. who should be billed for the time spent, and team support, i.e. sharing time management between more than yourself and billing support. I have not tried to use these features yet, I am not even sure they are supported in the free version.

An advanced feature that the desktop application supports is auto-tracking. I have no idea how this feature works, but I believe it detects what I am doing and automatically tracks this on to one or more projects.

Tagged: Toggl work

Shared Modules between Node and Browser

January 25, 2017 - Søren Alsbjerg Hørup

I am currently prototyping a game built using TypeScript + Node. Node will host some REST API’s + act as HTTP server + act as WebSocket server. The HTTP server part will host a React frontend also built using TypeScript.

What I want is the ability to share TypeScript code between the two parts of the application.Typically, I have always used outFile when working with React in the browser, because I find it very easy to embed into my index.html. This approach is however not feasable on the server side (it can be hacked, but is ugly as hell), since the server needs to import modules from node_modules using the ES6/TypeScript import syntax.

TypeScript supports the ability to emit ES5 JavaScript code using different module types, such as AMD, systemjs, etc. For this project I have experimented in using modules on both the server and the client portion of my code.

My structure is as follows:

  • /client contains all client related .ts files
  • /server contains all my server related .ts files
  • /library contains all my shared .ts files

This setup allows me to easily import modules from library in either client or server:

import someClass from "../library/someClass";

/client and /server has their own tsconfig.json file which tells the compiler on how to emit JavaScript code. On the /client, I have specified that I want to emit ‘AMD’ modules while on the /server I want to emit commonJS used by node.

When building, I invoke tsc on both /client and /server, which will emit more or less the same JavaScript output but where the module format differs. In the browser, I can easily include the AMD module loader and load all my stuff. I can even concatenate the output of the client (for my own modules) using outFile if I make sure to manually load the output in the browser before passing everything to the AMD module loader.

On the server, Node can use commonJS and require to load my modules without any issue, since I built the node part using commonJS as module loader.

The only con I have found is that /library directory gets compile twice, which is OK in my book since we are talking about different run-time environments (node vs the browser).

I need to test this setup a bit more, and see if it scales as well as I hope!

Google AMP

January 23, 2017 - Søren Alsbjerg Hørup

Google’s Accelerated Mobile Pages (AMP) has begun to see some widespread usage across the internet - atleast for the sites that I visit. I have always been skeptical regarding the AMP project, but I must admit that the AMP powered websites I visit using my phone are indeed fast to load.

AMP enabled pages are just HTML pages extended with AMP specific properties, such as amp-boilerplage and sets a number of restrictions to increase speed. The restrictions are however very restrictive, meaning that not all applications can be AMP enabled.

Restrictions include:

  1. No JavaScript apart from the JavaScript provided by AMP. Thats right, AMP powered pages cannot have homemade or third party JS.
  2. No input elements, i.e. no form support. AMP powered pages are one direction only.
  3. No external styles or inline styles, only style within a single style tag. In addition, the limitation for the style is 50kb.

Due 1. and 2., AMP targets to make content-heavy pages load very fast: news-sites, blogs, etc.

Google also provides AMP caches, where the content of a site can be loaded even faster. When googling for content on a smartphone or tablet, one can see that a site is AMP enabled by looking at the lightning icon.

ampproject.org is obviously AMP enabled

Although I prefer to use AMP powered content on my phone, I do not believe this is the way forward. One should improve the performance of one’s one site using standard techniques, such as reducing the number of DOM elements and reducing the number synchronous scripts.

Todays site are typically very slow due to all the garbage that is pulled in from external sites. This includes ads and especially modal windows showing up and blocking the page.

Tagged: Web

Debugging *this*

January 22, 2017 - Søren Alsbjerg Hørup

I recently had some issues with vscode and its TypeScript debugger when trying to read the content of the this variable. The debugger printout of the value of a variable when hovering above the variable - but the this variable was undefined.

I believed it was my closures that were not correct, thus making me replace all my functions with fat arrows. This was however not the case, since the application ran perfectly in node.

The issue turned out to be that this was not correctly source-mapped to _this. Recall that this within a TypeScript class is compiled to _this such that calling context issues are avoided. The debugger however failed to grasp the concept, making the mouse-over fail.

One has to manually expand the Closure in the debugger tab in vscode and look for _this if within a fat arrow calling context.

Visual Studio Code and Source Maps

January 20, 2017 - Søren Alsbjerg Hørup

It has been some time since I last required vscode’s JS debugging functionality. Today I ran into an issue using the latest version of vscode + TypeScript source mappings. Specifically, my debugger was unable to find the TypeScript source thus unable to hit any breakpoints.

I have all my TypeScript source saved into the /src folder. tsc compiles and stores the result into the /bin folder along with source mappings between the .js files and the .ts files.

My debugger was unable to locate the source files, even when the js.map files contained the absolute path to my src folder.

Apparently, one has to add outFiles to launch.json with a correct path to the /bin folder for this to work. vscode cannot automatically detect the the presence of map files along the out .js files. This is a bit puzzling, since my launch.json contains the path to the JavaScript file I want to launch.

"outFiles": \["${workspaceRoot}/bin/\*\*.js"\]

This snippet did the trick for me.

And yes! I know that /bin might not be correct naming since JavaScript files are not binary :-)

ScreenToGif

January 19, 2017 - Søren Alsbjerg Hørup

I am a big fan of GIF screenshots, such as this one:

1_8_hide-activitybar

The primary reason is that an animation can show soooo much more compared to a static picture. GIF is also much faster to display due to their small size, and they can be embedded in e-mails, webpages, etc. (although I fail to grasp WHY Outlook fail to show GIF animations…)

I have been on the lookout for a open-source GIF screenshot maker. Today I found ScreenToGif, a .NET application which can does exactly what I want: capture a Window and record the contents of the Window to a .gif file. This is a test capture I made using the tool:

test.gif

One feature I like very much is the ability to snap to a Window. This auto-sizes the capture area to match the Window in question without having to manually adjust. The default settings of ScreenToGif also matches my exact need, that of 15fps which I find fluid enough without feeling like a slideshow.

ScreenToGif can also save the capture as normal video, either as uncompressed .avi or using FFmpeg thereby supporting a huge amount of Codecs.

Anyway, if you need a GIF screenshot capture tool, give ScreenToGif a try!

Tagged: Review

Web.config Rewrite

January 18, 2017 - Søren Alsbjerg Hørup

Rewrite rules allow for rewriting an URL to another URI, e.g. accessing / can be rewritten as if the browser had access /abc. This is done on the server side, no 301 redirect is issued back to the client. This allows for prettier URLs.

A web project I am working on consist of a C# Web API 2.0 backend with a Javascript frontend. I wanted to keep all frontend stuff in the /Frontend folder while API stuff in the /Backend folder.

Looking from the perspective of the browser, I wanted that GET /api would rewrite everything to the C# Web API 2.0 backend, while GET / would rewrite everything to the /Frontend folder.

So when requesting e.g. /index.html, the server would rewrite the URL (behind the scenes) to /Frontend/index.html. Nice seperation IMO. This can be done from the Web.config file by writing two rules:

The first rule rewrites /api to /api and stops processing of further requests. This is needed such that the second rule is not processed.

The second rule rewrites /anything to /Frontend/anything, making it possible for me to save my frontend stuff inside the Frontend folder. Very nice indeed.

Apache Cordova

January 17, 2017 - Søren Alsbjerg Hørup

My son is lacking a bit in the language department. To help him get better I decided to implement an app which randomized a set of pictures into a grid of 4 cells. The app tells out loud the name of the object/thing in one of the pictures which he has to pick.

Screenshot of the finished app on Google Play

I decided that I wanted to tryout Apache Cordova (formerly PhoneGap) and build it as an hybrid-app. Apache Cordova can be installed directly from Node’s package manager ‘NPM’:

npm install -g cordova

To create an app, call

cordova create AppName

which will scaffold a Cordova HTML5 app in the folder AppName.

cordova run browser

will build and start the cordova application in a browser.

cordova run android

will build and start the cordova application in an Android environment. The latter requires the android SDK and an attached device or emulator.

One issues I found with Cordova 6.x was that I was unable to create a proper Android build. Assets was not correctly compiled. I reverted to Cordova 5.x which worked perfectly. My guess is that this will be fixed in the next version.

ASMR

January 17, 2017 - Søren Alsbjerg Hørup

I have just watched an Autonomous Sensory meridian Response (ASMR) YouTube video where I experienced ASMR. ASMR is a sensation best described as a tingling in the scalp and back of the neck.

I have experience ASMR before, but never from a video using headphones. My belief was that I had tingle immunity of whatever the ASMR guys calls it, apparently I am receptive.

The Danish television channel, DR3, has also began broadcasting ASMR videos, although without headphones I am reluctant to believe that they have any effect on that media.

Apparently, the first ever published scientific article on ASMR is from 2013 with the title:It Feels Good to Be Measured: clinical role-play, Walker Percy, and the tingles.

Tagged: ASMR

App Keyboard Shortcut

January 16, 2017 - Søren Alsbjerg Hørup

I recently installed the Todoist app for Windows 10 desktop environment. One annoyance I found was the inability to quickly start the app using a keyboard combination. This was possible in the legacy version.

A workaround I have discovered, which works for any Win 10 app, is to Pin the app to Start and then drag and drop a shortcut to e.g. the Desktop. Afterwards, it is possible to edit the Shortcuts ’Shortcut Key’ and provide a key-combination which will start the app.

Right-Click → Properties → Shortcut tab → Shortcut key

untitled Example of CTRL + ALT + S opening the Store application. Note the ‘Target’ name.

USB On-The-Go

January 15, 2017 - Søren Alsbjerg Hørup

I recently acquired an USB OTG adapter for my Android devices. I wanted to see what kind of peripherals I could connect and if they would function correctly.

The first peripheral I tried was a standard HP USB Keyboard, nothing fancy. This worked on both my Galaxy Tab A 10.1 (2016) device and on my Galaxy S5 phone. I also tried a no-name wireless keyboard with a small USB dongle, this also worked fantastic. The latter has built in mouse which was also recognized by both my devices.

Next I tried a XBOX 360 Wireless controller with USB dongle. No dice on my Tab A but working fine on my Galaxy S5. My Galaxy S5 has been flashed to cyanogenmod 14 with a 3.4 kernel while the Tab A is still running an unrooted stock 6.1 with a 3.1 kernel. My guess is that the Tab A’s 3.1 kernel has not been compiled with the xpad driver needed to run the XBOX 360 wireless controller, since it seems that the dongle gets power just fine by the micro USB port.

A quick google search has confirmed this. Apparently very few Samsung devices running android 5+ support the xpad driver out of the box.

Next step in this endeavor is to root the Galaxy Tab A and get the xpad driver loaded.

Woodchip Wallpaper Removal

January 14, 2017 - Søren Alsbjerg Hørup

I am currently in the process of renovating one of my rooms in my house. First thing first is removing the old woodchip wallpaper. Removal of the first layer of paint/wallpaper was easy, the last layer was a bit hard.

My guess is that the bottom layer includes the cohesive which is hard to remove. Using a waterspray and making the wall totally wet made for a world of difference. After 5-10 minutes of letting the wallpaper soak up the water, removal was much easier.

img_20170114_102411

I could literally get under the wallpaper and scrape it off in chunks. The places where the wallpaper was still sticking to the wall, I simply added a bit more water and waited a few minutes.

Mind Technique for Recalling Stuff

January 13, 2017 - Søren Alsbjerg Hørup

During my Lakka experiment (the Linux distro containing Retroarch and libretro) I had real trouble remembering the Lakka name when talking about the distro. I had to google “Linux emulator distro” several times since I forgot the name Lakka.

This puzzled me, why the heck could I not remember the term Lakka?!?! Google did not answer this question, however, Google provided me with a mind technique that might help me. By connecting the word I want to retain in my memory to something already in my memory, I can think of the latter and remember the first.

I tried this for Lakka, where I divided Lakka into Lak + Ka.

Lak is varnish in Danish.

Ka does not have any meaningful meaning in danish, but Kar, which comes close, is tub in Danish. In my mind I connected Lakka to Lak + Kar (a vanished tub), by repeating Lakka equals Lak + Kar 5-7 times during the day.

Conclusions: this worked! I can now easily recall Lakka by thinking about Lak, which is linked to Kar and combined sounds very much like Lakka.

Great success!

Todoist

January 12, 2017 - Søren Alsbjerg Hørup

I am a big fan of creating to-do lists. The primary reason is that they help me focus on the tasks that needs to be done, prohibiting me to drift into procrastination mode.

I usually write todos on a piece of paper when sittingat my PC. When not working, or when I require that my list of tasks are available anywhere I use Todoist.

Todoist is a To-do web application with a dedicated Android and iOS app. I use the Android app when on the go and the web application whenever I am at a desktop environment.

Todoist allows tasks to be scheduled using dates and relative time such as today, tomorrow, nextweek. Todoist can group tasks into user-defined projects using an hashtag.

Todoist provides auto-completion and intellisense making it easy to schedule and group tasks correctly.

On the programming side of things, Todoist has a RESTful API which one can use to interface with Todoist. Although I have yet to use this API, I might at some point implement a desktop application that can insert a task from any application (I miss such a feature).

Todoist comes in two flavors: Free and Premium. The freeversion supports the features described above. The Premium version also allows one to see done tasks, add labels and add comments to tasks, among other things. The free version does not support this, although I have not found these shortcoming a problem yet.

Virtualization using vCenter

January 11, 2017 - Søren Alsbjerg Hørup

I recently decided that one of my PC’s required a re-format and re-install (going from Win7 to Win10). A total reformat and install obviously requires that all my applications needs to be installed afterwards, this can take several hours. In addition my files, etc. needed to be backed up.

This time however I have decided to virtualize my current setup prior to doing the wipe and install. VMware provides a free tool called VMware vCenter which can virtualize a running Windows installation, i.e. create an image.

This even works without having to re-boot the system and the image can be stored on the same volume which one is trying to clone.

A minor issue I found during the cloneprocess was that I was unable to clone my Fat32 partion. The reason being that shadow copying (which is utilized by vCenter), does not support the Fat32 file system.

A huge issue I found after the clone process was that I was unable to login to the instance due to the VMware not accepting CTRL+ALT+DEL, CTRL+ALT+INS or using the virtual keyboard.

The reason being that my keyboard device driver was messed up in the clone, meaning that I actually had no virtualized keyboard device accepting keystrokes. Mouse was working however.

To fix this, I removed the CTRL+ALT+DEL security requirement and redid the clone. Keyboard was still not working, but I was able to login using the virtual keyboard.

Afterwards, I followed this Guide to get my keyboard up and running again. In my case, the values of the registry was different due to different hardware, but removing all lines except for kbdclass did the trick.

Note that Windows might complain about activation issues due to the big change in hardware.

Visual Studio Code

January 10, 2017 - Søren Alsbjerg Hørup

Visual Studio Code (vscode) is an open source IDE by Microsoft built using Electron (Node.js + Blink + Desktop package). I have been using the IDE for several months now, specifically to develop my JavaScript and TypeScript projects.

versioncontrol_merge

Out of the box the IDE comes with a extension management system, syntax highlight, IntelliSense for many languages and GIT integration.

A great feature of the IDE is the right click ‘Open With Code’ context menu where any directory can be opened in the IDE from Explorer. Project related stuff is saved in a .vscode folder within the directory.

The GIT integration just works. GIT integration in VS 2015 has always been a lackluster experience, although one can improve it by installing additional VS extension. No Subversion integration is provided out of the box, Subversion can be installed using the extension manager.

The IDE is frequently updated by Microsoft - atleast once a month a new update is pushed out. The Release Notes contains very detailed explanations of the changes and improvements in new versions and frequently contain GIF’s to show new features, such as this one from the November 2016 release:

1_8_hide-activitybar

Debugging is also supported. Different debug-engines can be installed allowing debug of many different kinds of applications, e.g. the Debugger for Chrome extensions allows debug of running javascript applications running in Chrome.

Even though vscode is more lightweight compared to VS, it takes the same amount of time (on my PC) to start each IDE. My guess is that the Electron framework takes a bit of time to initialize and compile the javascript that makes up vscode, while VS is more or less native binary code.

In any case vscode is really awesome to use and I can highly recommend it, at-least for web development using javascript, typescript, php, html, etc.

Window.localStorage

January 10, 2017 - Søren Alsbjerg Hørup

Persisting stuff between sessions is really easy using using the Window.localStorage API provided by most browsers today.

localStorage is a key/value store, where one can write and read keyvalues. Setting a value is super easy using setItem:

localStorage.setItem('key', 'value');

Getting back an item is done using getItem:

localStorage.getItem('key');

Persistence is per domain (and subdomain) which is really nice since one do not have to implement any annoying cookie notifications.

Google Inbox vs GMail

January 09, 2017 - Søren Alsbjerg Hørup

Some months back I made the switch from GMail to Inbox. Primary reason was that I was intrigued by the capabilities and filtering functionality provided by Inbox. I really like the concept of hiding detail by grouping mails into different categories and by hiding mails which are marked as Done.

YesterdayI switched back from Inbox to GMail. Simply put, hiding details is great in concept but does not work in reality (atleast for me). After a few months of Inbox usage I came to realize that I had lost overview - although mails were correctly categories, moved, etc. i struggled with my mail management.

In GMail (and nearly any other e-mail application) mails are typically sorted chronologically from top to bottom, in different folders which the e-mail application user has manually created. The latter means that I as a user is in complete charge of how much detail I want to expose in my daily-day.

For now, I have decided that I always want to see ALL my mail from top to bottom. I used flag/priorities to mark mails which are important - I use this for both work and private. Regarding the postpone feature provided by Inbox, I use a task-management system instead (specifically Todoist).

Right now I am a happy e-mail user…

Givers vs Takers

January 08, 2017 - Søren Alsbjerg Hørup

I recently watched the “Are you a giver or a taker?” TED talk by Adam Grant. Basically, there are three kinds of people: givers, takers and matchers. Where givers give more than they receive, takers take more than they give and matchers try to balance giving and taking equally.

The aim of the talk is to “promote a culture of generosity”, which I more or less read as “promote a culture where givers are recognized, empowered and given credit!“. Lately, I have been trying to notice in my “sphere” who are takers and who are givers. Recognizing matchers seems to be easiest since these people help you if you help them.

In any case, my personal aim is to help empower givers as much as I can, and figure out what I am in the eyes of others: a taker? a giver? or a matcher?

Create GUID using Visual Studio

January 07, 2017 - Søren Alsbjerg Hørup

Creating a GUID is very easy using Visual Studio. Tools->Create GUID shows the following Window:

image_2

Here it is possible to create a GUID represented in different formats. Typically I use option 5. when working on WiX installation projects and option 4. for any other type of project.

Logitech G930 - Quick Review

January 07, 2017 - Søren Alsbjerg Hørup

I received a Logitech G930 headset for Christmas - and have been using it for a couple of weeks now. Prior to the G930, I owned a G35 which is more or less 1:1 with the G930 except for the wireless capabilities of the G930 which the G35 lack.

The good news is that the headset performs exactly as my G35. I had a slight dread that the quality of the audio would be lower due to wireless compression, luckily this is not the case. Battery life is excellent IMO, about 10 hours with 2 hourish charging time - more than enough for my ½-2 hour use per day.

I have had some troubles regarding the drivers when resuming from sleep (Windows 10). Specifically two issues:

  • After sleep, sometimes the headset will not emit any audio regardless of the volume setting. Changing the volume is possible on the side of the headset, and Windows recognizes this, but the headset does not transmit any audio. An unplug/replug or disable/enable of the device is required.
  • After sleep, sometimes the surround and center channels of the headset ceases to function. Audio is only outputted on the left and right channel. Again, a unplug/re-plug or disable/enable of the device is required.

Apart from these issues, I are entirely happy with the device.

g930-gaming-headset-images

PHP built in WebServer

January 06, 2017 - Søren Alsbjerg Hørup

PHP has a built-in WebServer for development purposes. This makes it very easy to get started with PHP development, simply call:

php -S localhost:8081

This will start the PHP web server.

PHP 7.0.11 Development Server started at Fri Jan 5 23:01:11 2017 Listening on http://localhost:8081 Document root is C:\Users\XYZ Press Ctrl-C to quit.

Easy as eating pie!

ReactJS Spinner

January 05, 2017 - Søren Alsbjerg Hørup

Writing a spinner component which displays ... animated using ReactJS is super easy using TypeScript + JSX (TSX).

First, define the SpinnerState interface.

interface SpinnerState { frame:number; }

Next define the Spinner component. The Spinner component has state which conforms to the SpinnerState interface.

class Spinner extends React.Component<any, SpinnerState> { }

Next define the constructor inside the Spinner to initialize the state:

constructor(props) { super(props); this.state = {frame:0}; }

Define the render method which will take care of the actual rendering.

render() { return <div>{Array(this.state.frame + 2).join(".")}</div> }

Define the running flag, componentDidMount method and componentWillUnmount method.

private running = true; componentDidMount() {
    let interval = 100; let f = ()=> { 
        if (this.running) 
        { 
            let frame = this.state.frame; frame++; 
            if (frame == 5) { frame = 0; } 
            this.setState({frame:frame}); setTimeout(f, interval); 
        } 
    }
    setTimeout(f, 0); } componentWillUnmount() { this.running = false; }

Thats it! using the component is as simple as writing:

<Spinner/>

inside another react component.

Retro Super Nintendo Controllers

January 04, 2017 - Søren Alsbjerg Hørup

Bought a set of USB Super Nintendo Controllers from China for my Lakka installation at home. Not sure if they are supported by the Kernel however - i’ll known in a month or two.

s l1600

Blogging engaged...

January 03, 2017 - Søren Alsbjerg Hørup

For fun I decided that 2017 should start with me creating a blog. First step after this decision was:

  • Should I host my own wordpress/xyz blog engine on my Raspbarry Pi at home, or.
  • Create a blog at wordpress.com.

Simply put, wordpress.com was the obvious choice due to:

  • Free as in Free beer (atleast for now).
  • Super easy to setup.
  • Used by a huge amount of people.

My aim with the blog is just to post stuff - nothing serious. Hopefully, I can manage to blog at-least once a week.

Follow button woes

January 03, 2017 - Søren Alsbjerg Hørup

One aspect I have tried to customize away is the follow button/panel in the bottom right corner. Apparently, this can not be completely removed! atleast I have not been 100% successful.

The annoyance can be minimized by accessing the wordpress admin dashbord.*yoursite*.wordpress.com/wp-admin

untitled

Lakka Distro

January 03, 2017 - Søren Alsbjerg Hørup

Lakka is a Linux distribution which includes the RetroArch emulator out of the box. In addition, it includes configurations for many different input controllers, such as the PS3 controller, XBOX 360 controller, among others.

I had an old PC laptop laying about with a semi broken screen that I have decided to convert into a Lakka installation, just for fun.

Super easy to get started, simply *flash* a USB with the Lakka distro and boot from it either in Live mode or Install mode.

After installation, one can setup SSH and push ROMS to the storage of the device. Lakka will, after a scan is initiated, find and identify all the game roms.

The only two issues I encountered where the inability to setup my WiFi connection and RetroArch’s menu system being too slow on my 1.6Ghz singlecore ATOM powered laptop.

The latter was due to Lakka was default configured with a *shader powered* menu system requiring a somewhat beefy GPU, or, let me rephrase the latter, requiring a GPU which were more powerful than the Integrated and nearly non-existing GPU features in the ATOM… It is however possible to configure RetroArch to use a less demanding menu system, as shown below:

untitled